Pneumatic ATC
Pneumatic ATC changes tools automatically on a spindle with an air-powered drawbar. One controller output opens and closes the collet. The spindle drops the current tool into its rack slot, picks up the next one and measures it.
The dialog title shows Beta. Write down or back up your settings before you update the plugin.
Only one tool changer plugin can be enabled at a time. See Tool changer plugins.
Before you start
- Air supply with a regulator, set to the pressure your spindle needs.
- The drawbar valve wired to a controller output.
- A tool rack with fork or cup holders.
- A tool length setter.
- Home the machine.
Turn it on
- Open Settings > Plugins.
- Disable any other tool changer.
- Enable Pneumatic ATC.
- Open the Plugins tab in the console area and press PneumaticATC.
The plugin now controls the tool buttons on the main screen.
Press Save on each tab after you change something. If you close with unsaved changes, you can Cancel, Discard or Save & close.
ATC Setup
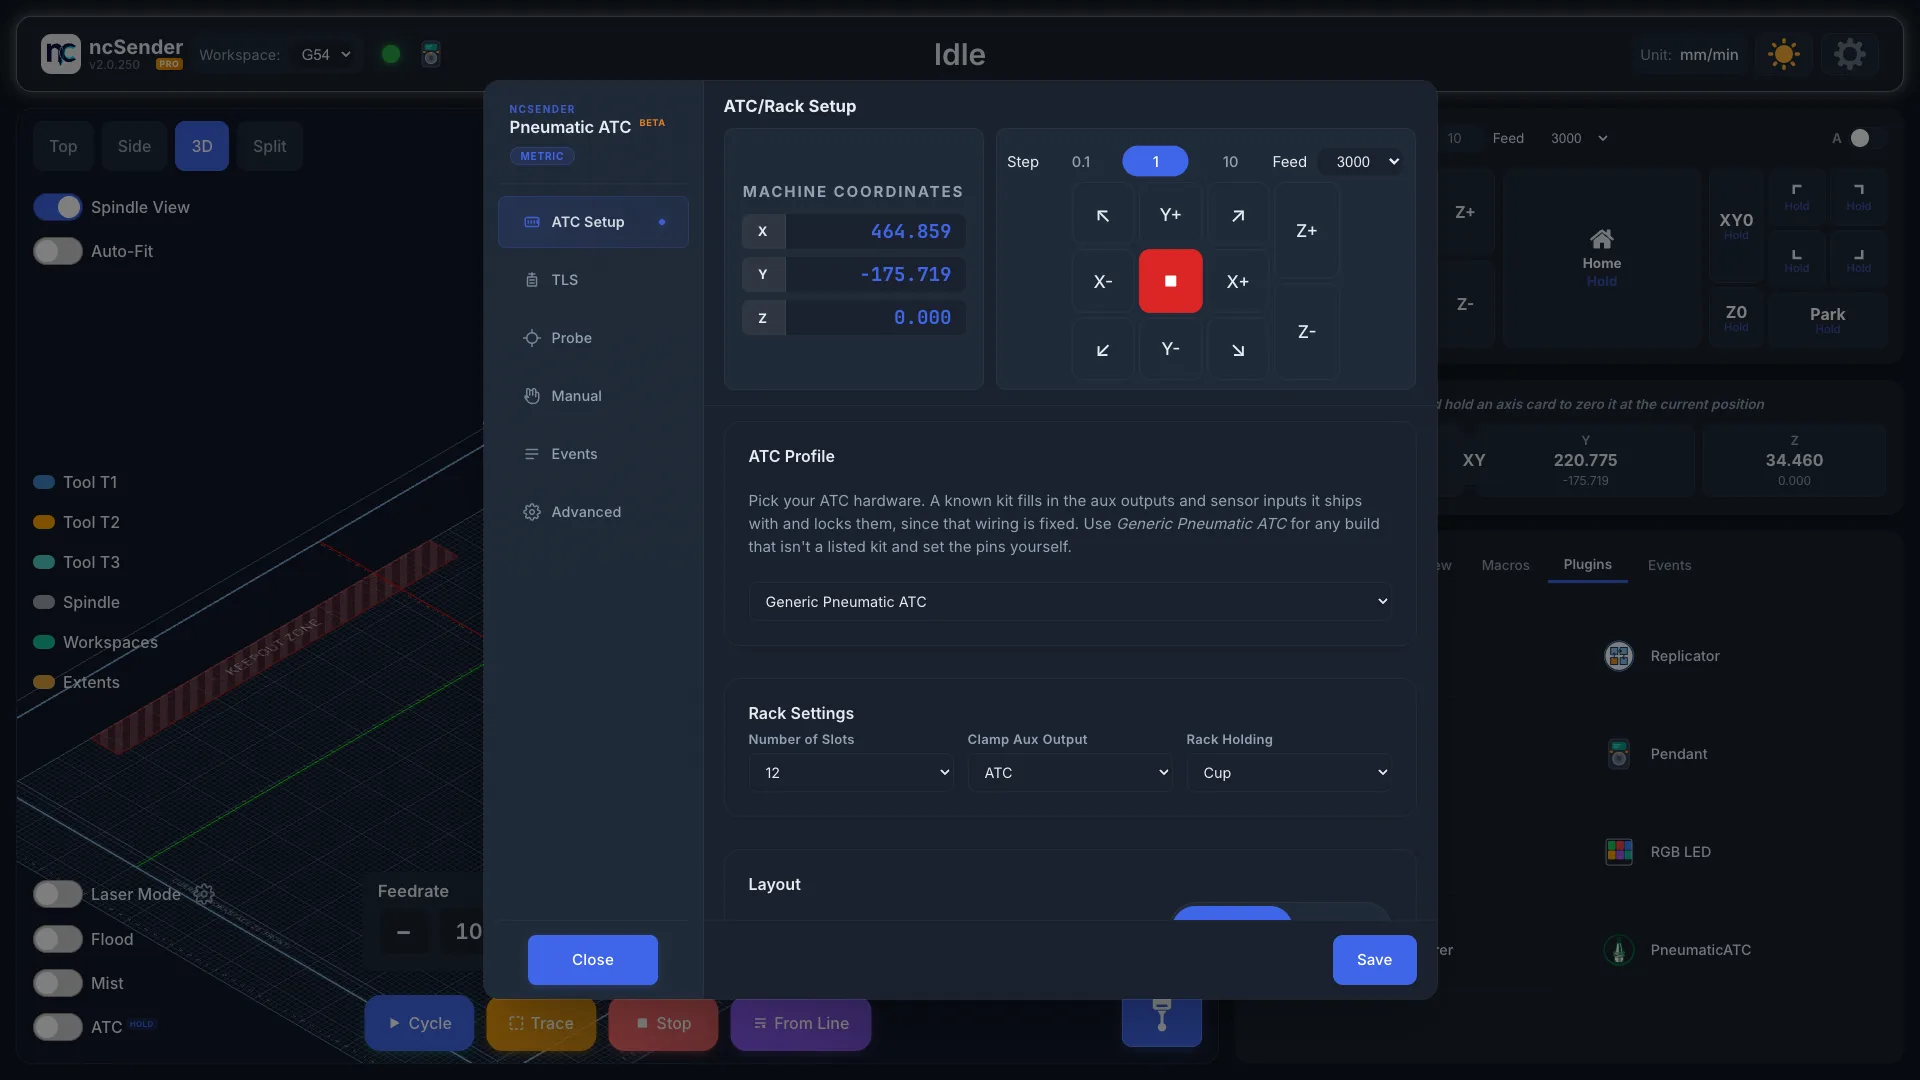
ATC Profile
- Generic Pneumatic ATC: for any build that isn't a listed kit. You pick the outputs and inputs yourself.
- Sienci ATC: for the Sienci kit. Its outputs and inputs are filled in and locked, because the kit's wiring is fixed.
When you pick Sienci ATC, the plugin asks Import positions from the controller? Press Import to copy the positions you saved with Sienci's setup, or Skip to type them in. Nothing moves.
Rack Settings
- Number of Slots: 1 to 32.
- Clamp Aux Output: the controller output wired to the drawbar valve.
- Rack Holding: Fork (the tool slides in from the side) or Cup (the tool drops straight in).
- Slide Direction, Slide Distance (mm) and Slide Speed (mm/min): which way, how far and how fast the spindle slides out of a fork.
- Safety Margin (mm): extra room the machine keeps around the rack when moving past it.
Layout
Pick how your slots are placed.
Linear array: slots in a straight line, evenly spaced.
- Set Orientation (X or Y) and Direction (− or +).
- Set Slot Distance (mm), the distance between slot centres.
- Jog the spindle into slot 1 and press Grab current under Slot 1 Position.
Custom: set X and Y for each slot in the table. Use it when slots aren't evenly spaced.
When you switch from Linear array to Custom, the plugin asks Auto-populate custom slots? Press Yes, auto-populate to start from the linear positions, or No, keep existing to keep the table as it is.
Engagement Z is the same for every slot. It is how far down the spindle goes to grab a tool.
Options
Show G-Code Commands on Terminal shows the command the plugin sends, so you can copy it into your own program or post-processor.
A tool change
A change from a running program: the spindle stops, the head routes to the rack, swaps the tool and returns to where it left off. The header reads Tool Changing throughout, and the job picks up on the next line.
TLS
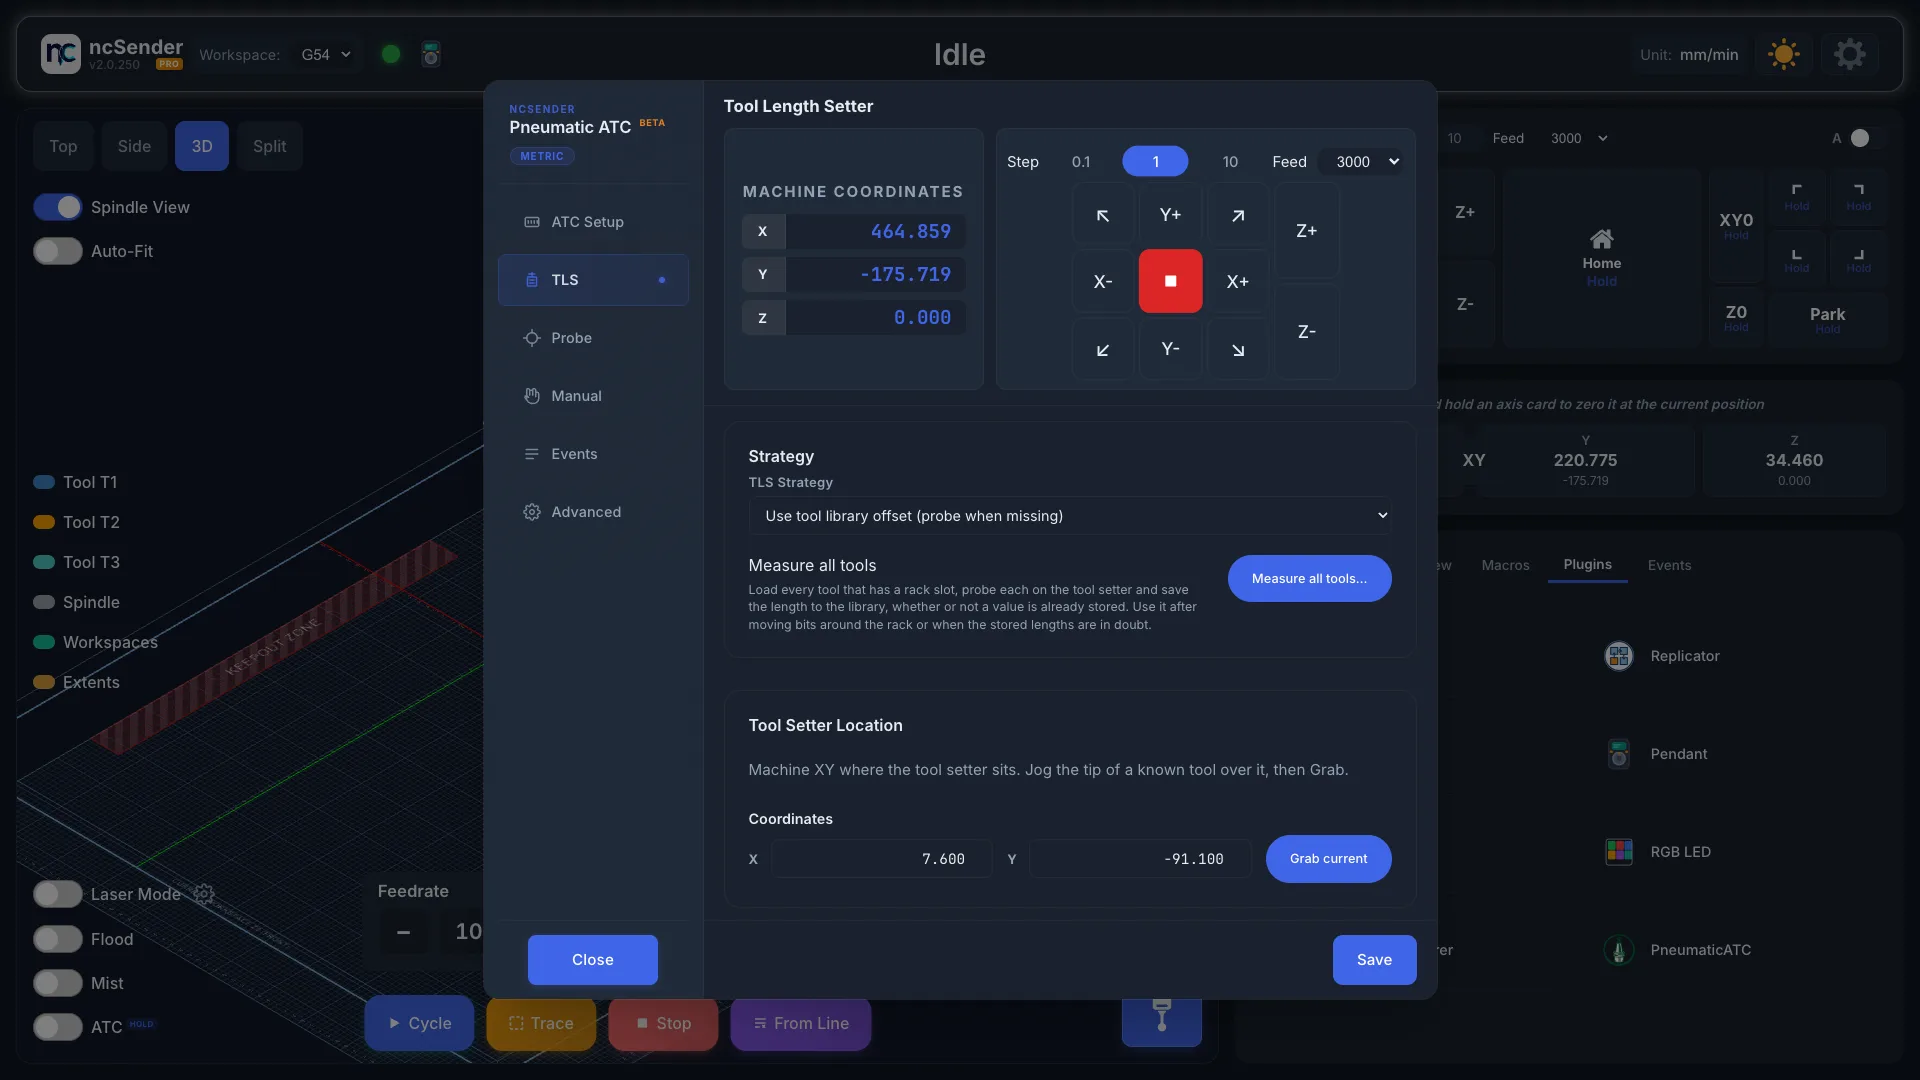
TLS Strategy
- Probe after every tool change: measures every tool each time it is loaded.
- Use tool library offset (probe when missing): uses the length saved in the Tool Library, and only measures a tool that has no saved length.
Manual tools, numbered above your slot count, are always measured, whatever the strategy. They are fitted by hand, so their length changes every time.
With Use tool library offset, if you set Z0 before any tool was measured, the change still touches off the tool coming out, so your Z0 carries over. If that measurement matches the tool's saved length (within 0.05 mm), the new tool's saved length is used and it isn't measured. If it doesn't match, the new tool is measured as usual.
Why a tool with a saved length is sometimes measured anyway
With Use tool library offset, a tool can still be measured even though its button shows a dot (a saved length). This happens on the first tool change after:
- Power-up or a controller reset. Nothing has been measured yet, so the saved lengths have nothing to line up with.
- A tool change or TLS stopped in the middle of measuring. If the change had already cleared the tool length or started measuring, ncSender can't trust the length any more, so it clears it and the next change measures the new tool. An abort before that point, for example when the tool sensor finds no tool, keeps the length, and the next change uses the saved one.
This is a safety step, not a fault. The measurement normally matches the saved length, and the saved lengths are used again from the next change on.
Measure all tools
Press Measure all tools… to load every tool that has a rack slot, measure each one and save the lengths to the Tool Library. Do this after moving bits around the rack, or when you don't trust the saved lengths.
- Make sure the rack, tool setter and clamp output are set, and that at least one normal tool change has worked.
- Press Measure all tools…, then Start.
- Stay at the machine. Don't close the window, refresh or disconnect.
- Wait for Tool lengths updated, then press Close.
Press Cancel to stop early. The machine stops right away.
Tool setter and measuring
- Tool Setter Location: jog the tip of a known bit over the tool setter and press Grab current.
- Seek Start Z (mm): the machine height where measuring starts. Keep it above your longest tool.
- Seek Distance (mm) and Seek Feedrate (mm/min): how far and how fast it searches for the tool setter.
Probe
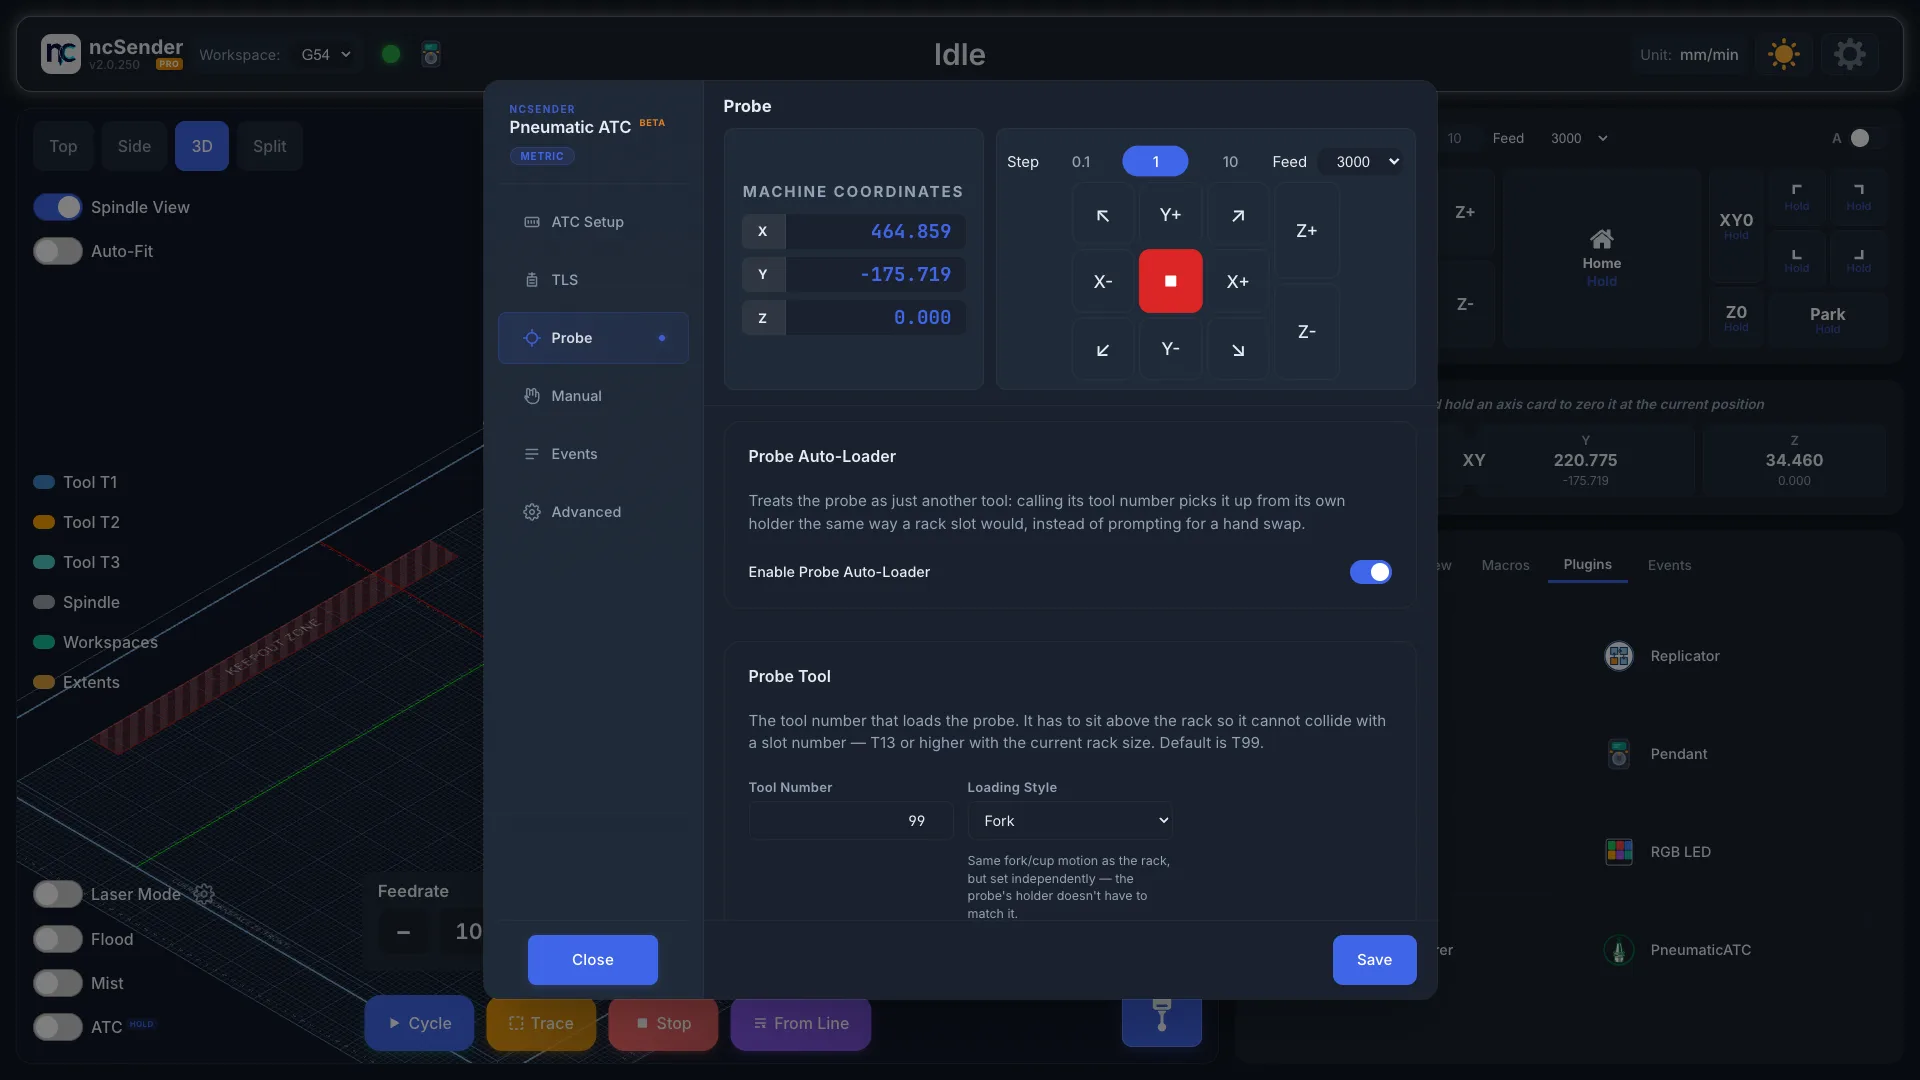
Turn on Enable Probe Auto-Loader if your touch probe has its own holder. The machine then picks up and puts away the probe like any other tool.
- Tool Number: the tool number for the probe (99 by default). It must be higher than your number of slots.
- Loading Style: Fork or Cup. It can differ from the rack.
- For a fork, set Slide Axis, Slide Direction, Slide Distance (mm) and Slide Speed (mm/min).
- Probe Position: jog into the probe holder and press Grab current.
Verify probe after pickup
Turn this on to check the probe works right after it is picked up. It catches a broken or bent probe tip before it can crash into the tool setter.
- Simple: set Verify Z (mm) to the height where the probe tip is level with the holder's edge, or jog there and press Grab current Z. The probe then touches the holder's edge. If it doesn't trigger, the tool change stops.
- Advanced: write your own check. Regenerate from Simple fills the editor with the Simple check as a starting point.
Manual
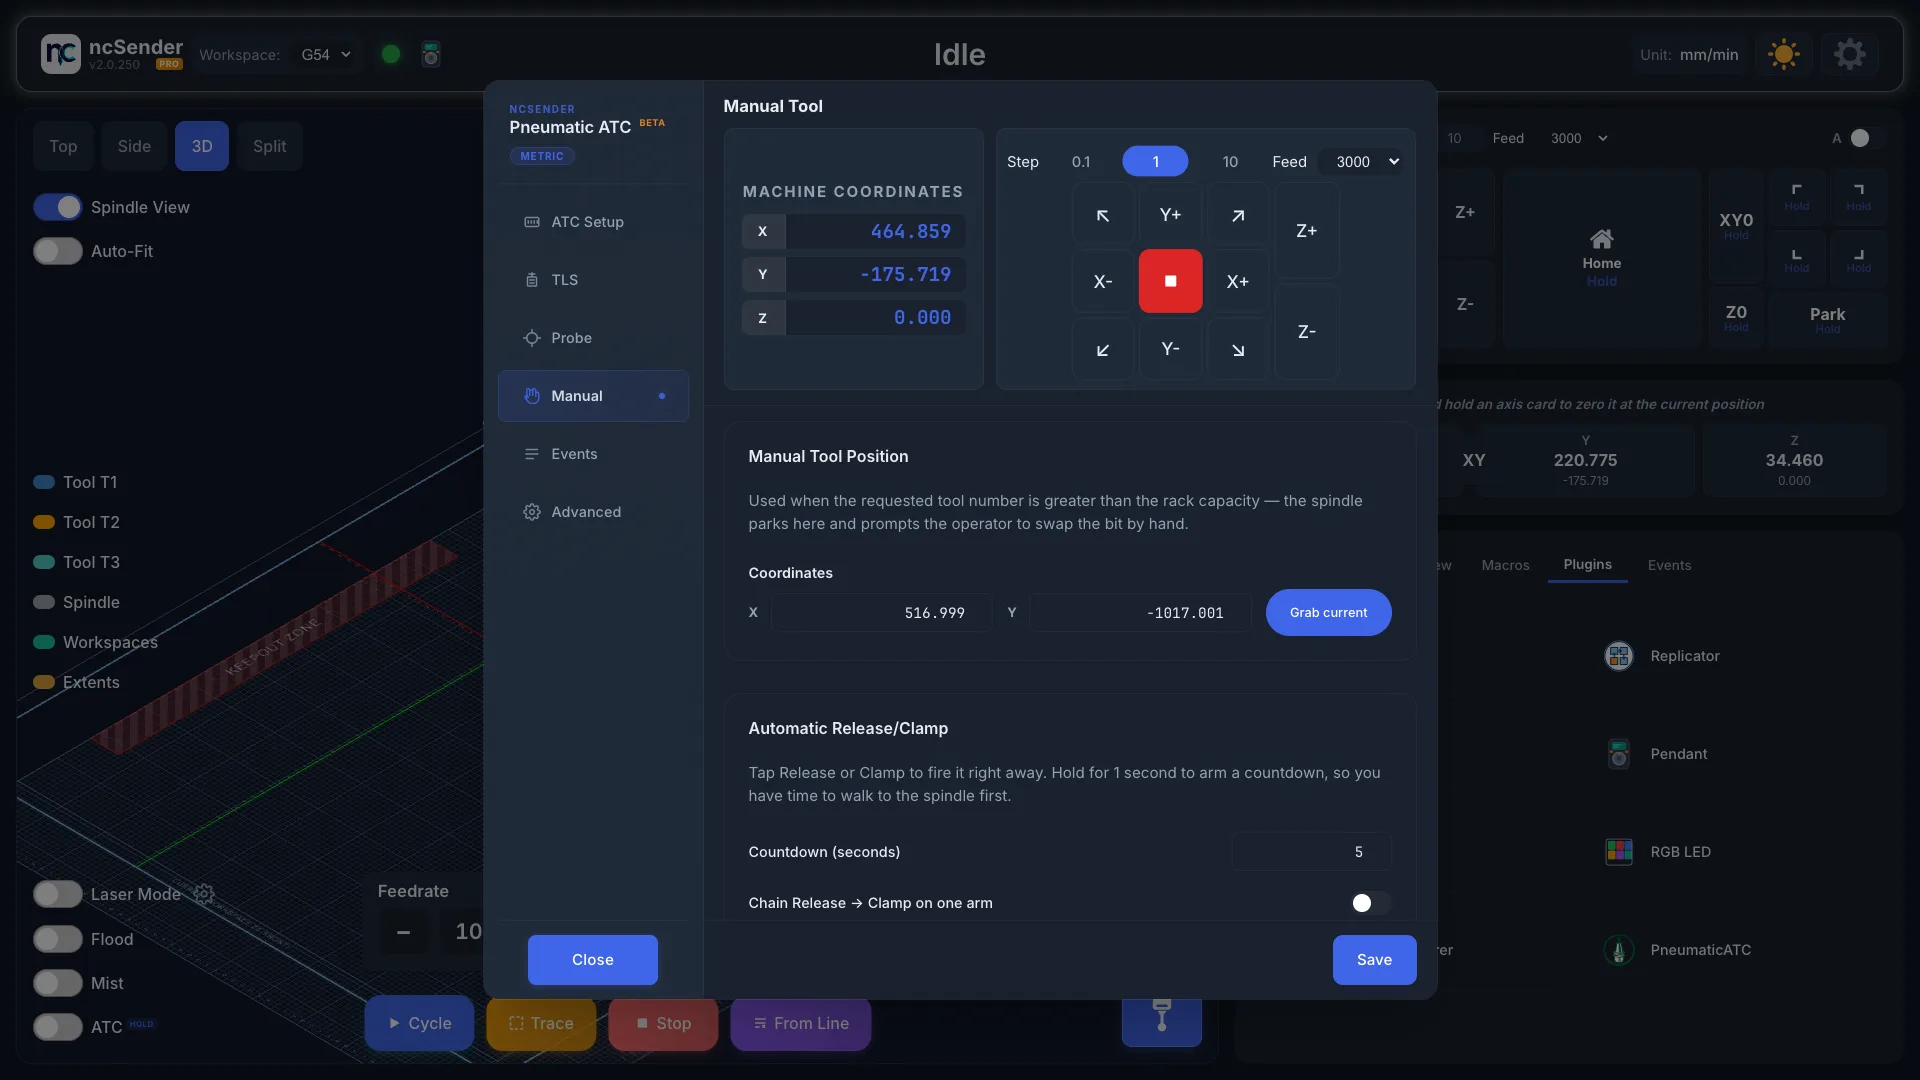
Manual Tool Position is where the spindle parks when you ask for a tool number higher than your number of slots. You then change that tool by hand. Jog there and press Grab current.
Tools outside the slots keep their offsets
A tool doesn't need a slot to use its TLS offsets and stored TLO. The tool number is looked up as a slot first, then as a Tool ID. See How a tool number finds its tool.
Automatic Release/Clamp
In the manual tool change prompts, Release opens the drawbar and Clamp closes it.
- Tap a button to open or close the drawbar right away.
- Hold a button for 1 second to start a countdown, so you have time to walk to the spindle. Set the time with Countdown (seconds).
- Chain Release → Clamp on one arm: one hold releases, waits, then clamps.
Events
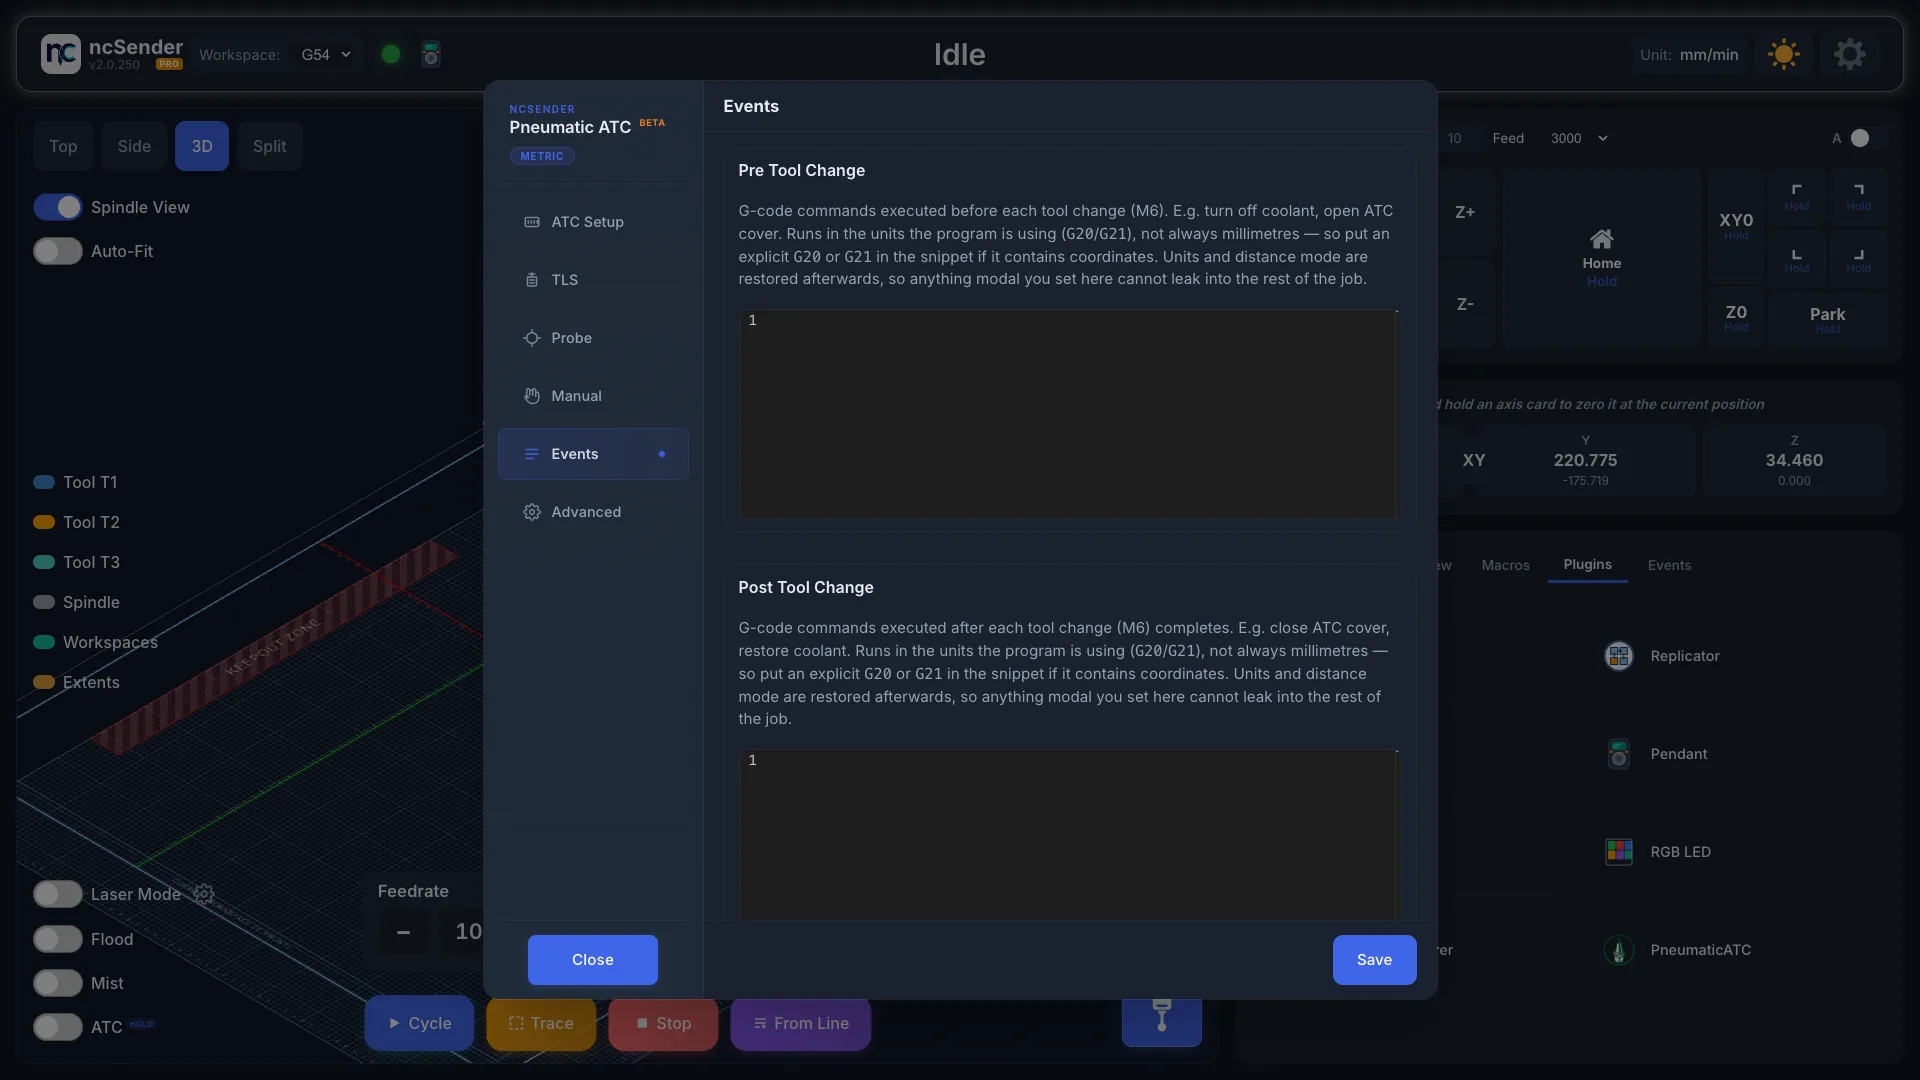
Add your own G-code to run at each step:
- Pre Tool Change and Post Tool Change: before and after every tool change, for example to open and close a rack cover.
- Pre TLS: just before measuring, for example
M64 P1to switch on a wired tool setter. - Post TLS: just after measuring, for example
M65 P1to switch it off. - Abort Event: when a tool change is aborted. The plugin always clamps the drawbar first, then runs this. Leave it empty if you need nothing extra.
The Post Tool Change code runs once the new tool is loaded and measured and the spindle has left the rack and tool setter at safe Z, before the machine goes back to where the tool change started. Use it for steps like picking up a dust shoe. It runs the same way for a tool change you start by hand, not only during a job. Post TLS still runs at the tool setter, right after measuring.
Advanced
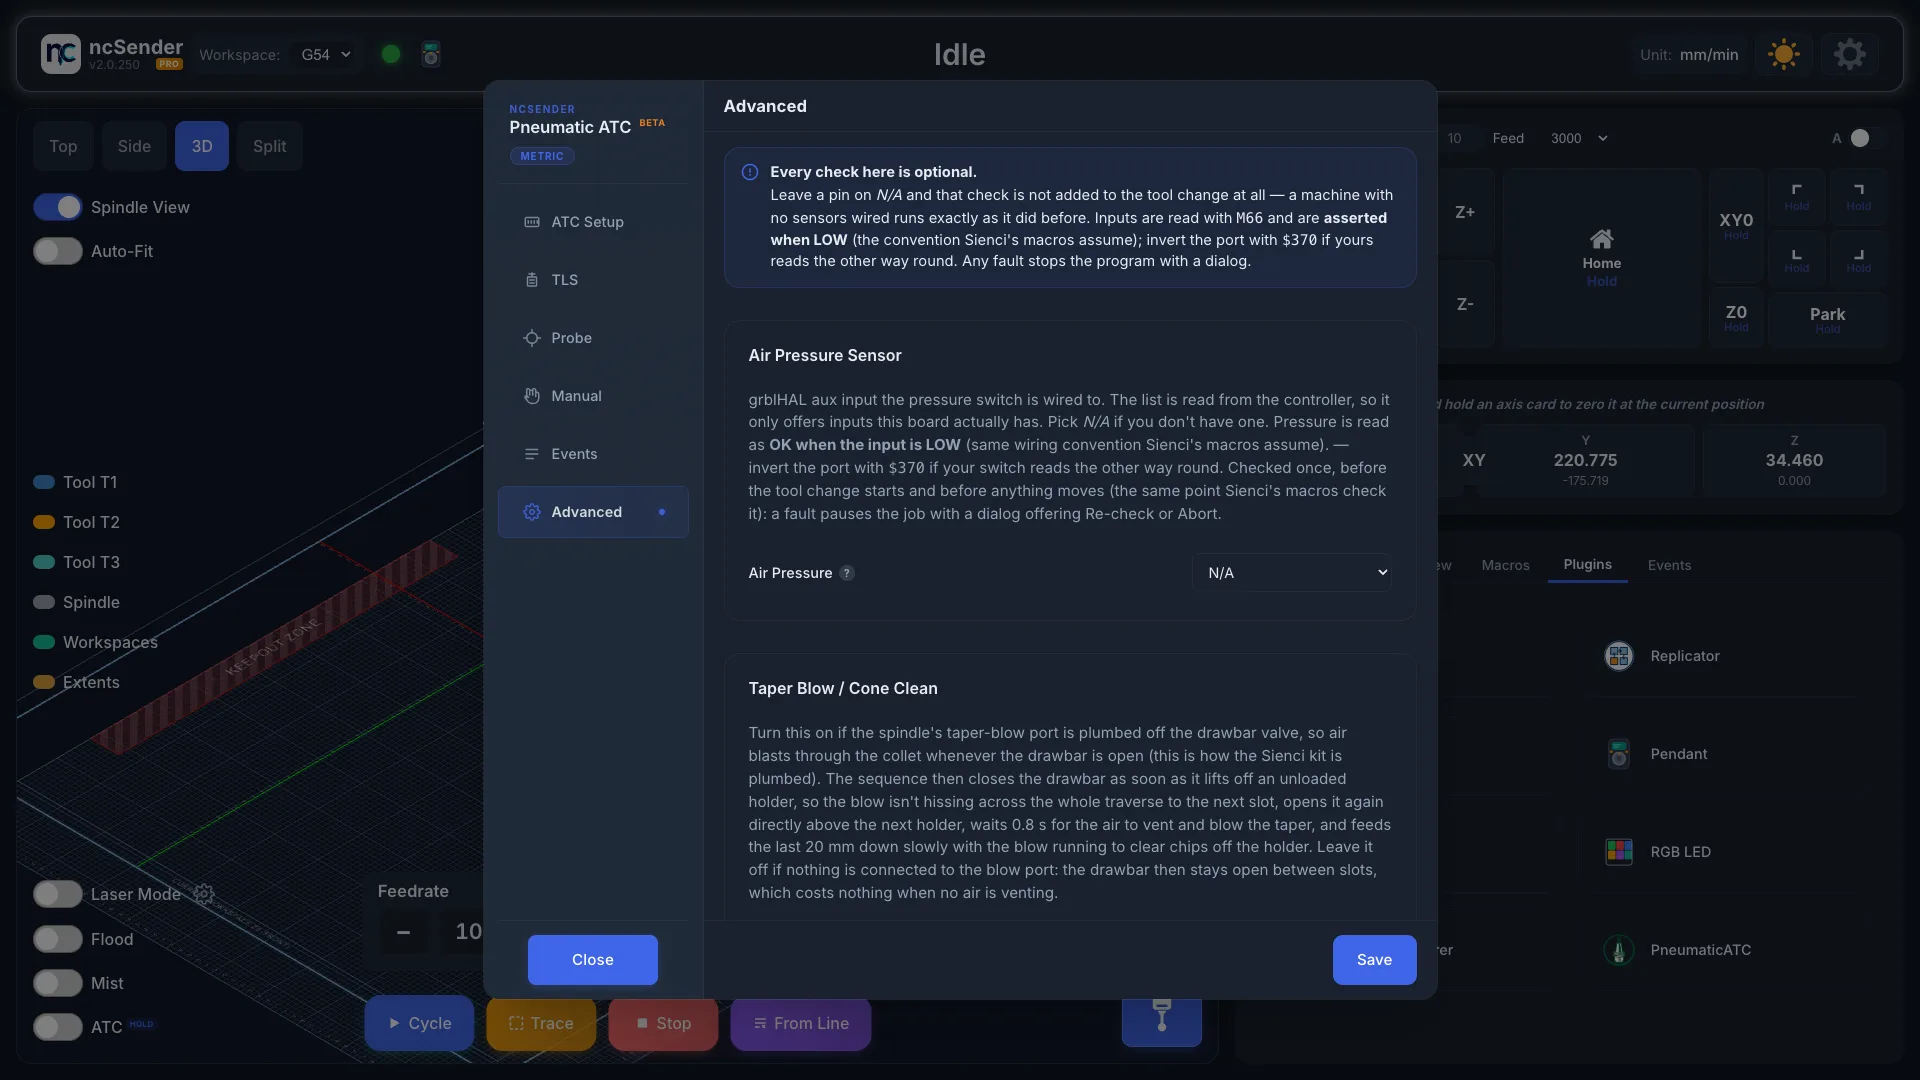
- Air Pressure Sensor: the controller input your air pressure switch is wired to, or N/A if you don't have one. The list shows only inputs your controller has. Pressure is checked once, before the tool change moves.
- Taper blow / cone clean: turn this on only if your spindle's taper-blow port is fed from the drawbar valve, as on the Sienci kit. The air then blows chips out of the spindle just before each pickup, and the drawbar closes while travelling so air isn't wasted. Leave it off if nothing is connected to the blow port.
- Tool Sensors (Coming soon): Tool Sensor and Tool Holder can be set now, but nothing checks them yet.
Change a tool
Press a tool button on the main screen, or run M6 T2 (for tool 2). A job that
reaches a tool change does the same. The machine puts the current tool back in
its slot, picks up the new one and measures it.
If you set Z0 before any tool was measured, the change first measures the tool that is still in the spindle, so your Z0 carries over. A tool that hasn't been measured since power-up is measured for you when you start a job. See Measuring after power-up and Set Z0 before or after TLS.
You can also type these in the console:
$TLS: measure the tool that is in the spindle.$SLOT3: move to slot 3. Use it to check your slot positions.
Prompts you may see
Air Pressure Low: the air pressure switch says there isn't enough air. Check the compressor, regulator and air lines, then press Re-check. Press Abort to stop.
Air Pressure Still Low: pressure is still low after two checks. Press Abort unless you are sure the sensor is wrong and the air is fine. Continue anyway runs the tool change without good air, and a tool can be left loose or dropped.
Unload Failed / Load Failed: remove or fit the bit by hand, then press Continue, or press Abort to stop.
Drawbar Did Not Open, Drawbar Did Not Close and No Tool In Spindle: a drawbar or tool sensor didn't report what it should. The spindle lifts to safe Z first, so your hands are clear of the rack.
- Continue: the sensor was wrong, or you fixed it by hand. The tool change carries on as if the check had passed.
- Abort: the spindle leaves the rack the normal way and goes back to where the tool change started, then the change stops. If the drawbar was opened for an unload, it is closed again first, so a tool still in the spindle stays held.
Tool Did Not Release: the tool came out of the rack with the spindle. Remove it by hand, then press Continue, or press Abort to stop.
Manual Unload, Manual Load and Manual Swap: shown for tool numbers above your slot count.
- Press Release to open the drawbar.
- Take out the old bit and/or put in the new one.
- Press Clamp to close the drawbar.
- Press Continue.
Troubleshooting
- Air Pressure Low keeps coming back. Check the compressor is running and up to pressure, and that no air line is kinked or loose. If your switch reads the opposite way, the input needs to be inverted in the controller settings.
- A tool is loose after a change. Check that Clamp Aux Output is the output wired to the drawbar valve, and that the air pressure is high enough.
- Probe check fails after pickup. Check the probe tip for damage, and that Verify Z (mm) is level with the holder's edge.
- The plugin won't enable. Another tool changer is enabled. Disable it first.
- No Save button. See the FAQ.