Tool Changer
Everything about changing and measuring tools: the Tool Changer settings tab, the tool buttons in the visualizer, tool changer plugins, and the Tool Length Setter (TLS). Your list of bits and which slot each one sits in are in the Tool Library.
Tool Changer Settings
Open Settings → Tool Changer.
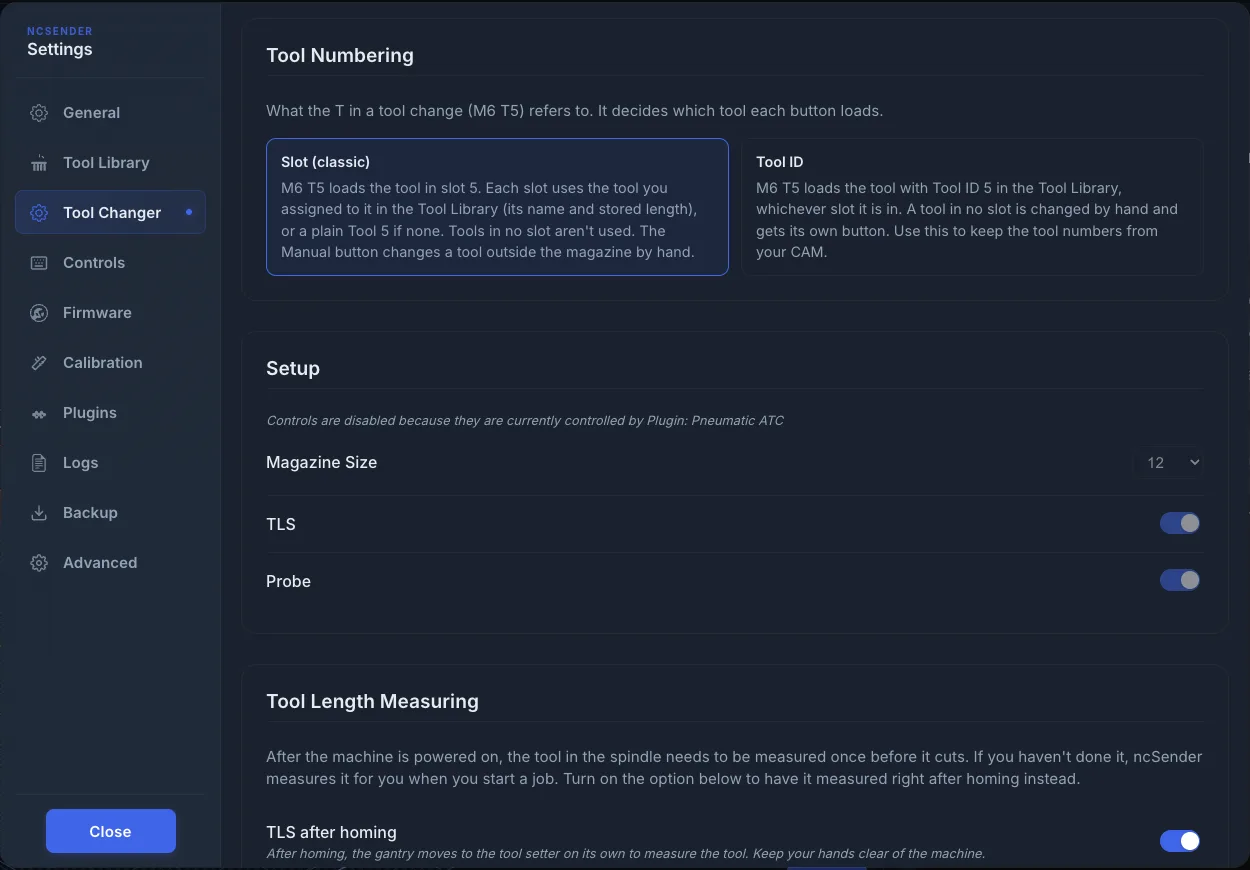
Tool Numbering
At the top of the tab, choose what the T in a tool change (M6 T5) means. Tap
the card you want:
- Slot (classic):
M6 T5loads the tool in Slot 5, the way tool changes always worked on most CNC controllers.- Each slot uses the tool you assigned to it in the Tool Library: its name and its stored length.
- A slot with nothing assigned is simply Tool 5.
- Tools in your library that aren't in a slot aren't used.
- The Manual button changes a tool outside the magazine by hand.
- Tool ID:
M6 T5loads the tool whose Tool ID is 5 in the Tool Library, whichever slot it sits in.- A tool that isn't in any slot is changed by hand and gets a button of its own.
- Use this to keep the tool numbers from your CAM software, even when tools move between slots.
A new installation starts on Slot (classic). If you already kept tools in your Tool Library before this setting existed, you start on Tool ID, so nothing changes for you. You can switch at any time; your Tool Library isn't changed either way.
Tool Numbering is yours to choose even when a tool changer plugin controls the Setup settings below.
Setup
These settings decide which buttons show in the visualizer:
- Magazine Size: how many slot buttons to show.
- TLS: show the TLS button.
- Probe: show the Probe button.
Shrinking the magazine
Lowering Magazine Size removes tools from the slots above the new size. It asks first. The tools stay in your library.
Plugins take over these controls
When a Tool Changer plugin is on, these settings are locked and a message names the plugin: "Controls are disabled because they are currently controlled by Plugin: …". The plugin decides which buttons show. Turn the plugin off to get the settings back.
Tool Length Measuring
This card shows only when TLS is on and a tool changer plugin is installed.
After the machine is powered on, the tool in the spindle needs to be measured once before it cuts. If you haven't done it, ncSender measures it for you when you start a job. See Measuring after power-up.
- TLS after homing (off by default): measure the tool right after homing instead of waiting for the job to start.
The machine moves on its own
With TLS after homing on, the gantry moves to the tool setter by itself after homing to measure the tool. Keep your hands clear of the machine.
Tool Buttons

The buttons are, in order:
- Slot1, Slot2 …: one per magazine slot. The current tool is highlighted. Tools
used in the loaded file are marked, so you can see what the job needs.
- With Tool ID numbering, a slot with no tool assigned is greyed out and does nothing: assign a tool to it in the Tool Library first. Tools you keep outside the magazine get their own buttons after the slots.
- Manual (Slot (classic) numbering only): for changing tools by hand. It loads the first number past your magazine (Slot 7 on a 6-slot magazine) and is active when the current tool isn't in a slot.
- Probe: loads your probe tool. The tooltip shows its number, for example Probe (Hold to load T99).
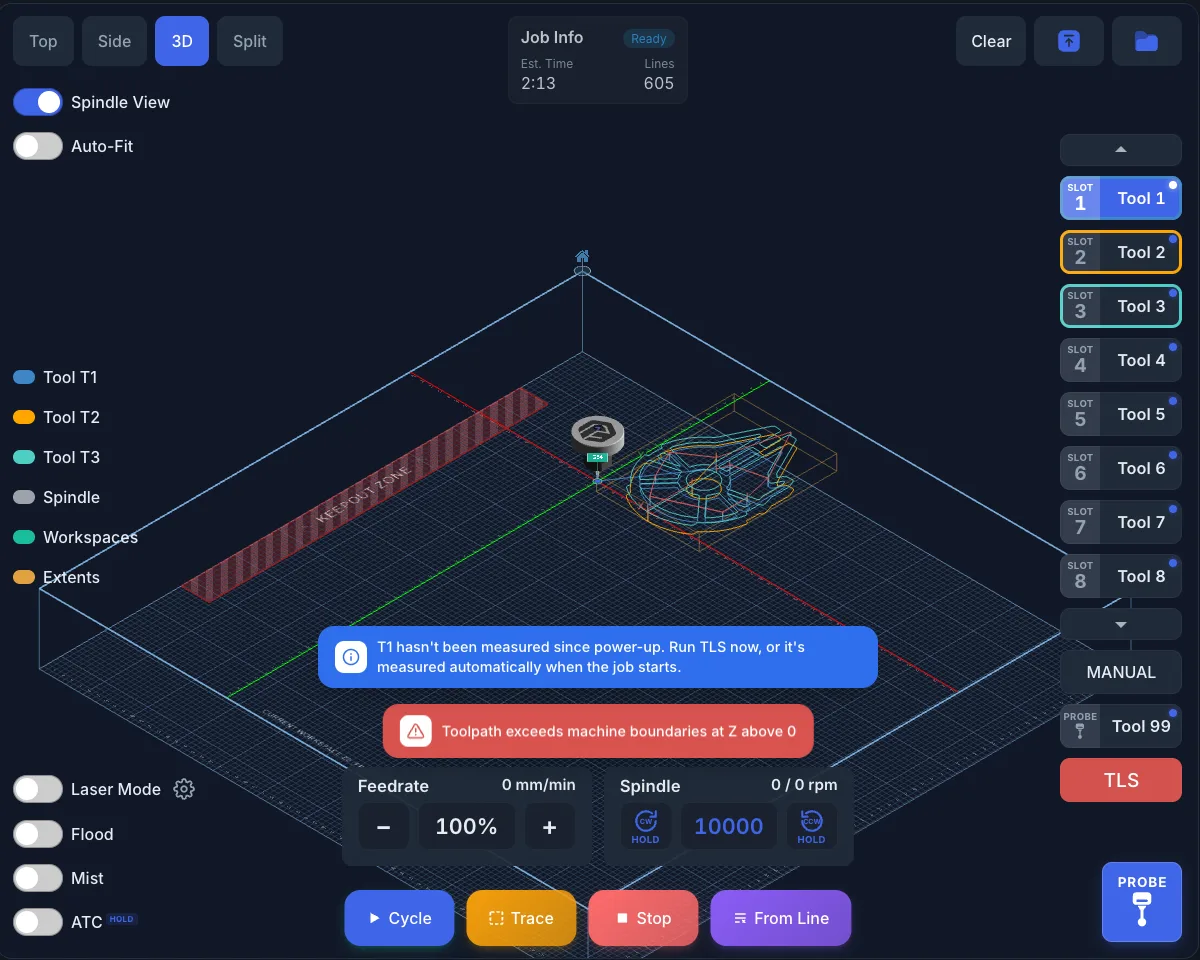
- TLS: measures the current tool (see below). It is off when no tool is loaded. It blinks red when the loaded tool hasn't been measured since power-up.
To use the buttons:
- Hold a slot button for 1 second to change to that tool.
- Hold the current tool's button to unload it.
- Hold TLS to measure the current tool.
- Tap a slot button to see its tool ID, diameter and type.
A dot on a slot button, or on Probe, means that tool has a stored TLO. Hover over it to see the value.
Tool change prompts show the tool's name, not just its number.
Machine is not homed
If homing is set up but the machine isn't homed, a tool change or TLS shows Machine is not homed first. Choose Continue to go ahead or Abort to stop.
A tool change typed or sent outside a job is blocked while the safety door is open.
Tool Changer Plugins
Tool Changer plugins add more tool-change features:
- Rapid Change ATC: automatic tool changer support.
- Pneumatic ATC: pneumatic automatic tool changer support.
- Manual Tool Changer: guided manual tool changes with TLS.
While one is on, it controls the tool settings above: how many buttons show, and whether TLS and Probe show. Turn the plugin off to give control back to the Tool Changer settings.
How M6 is handled (grblHAL)
What happens when a file or a button asks for a tool change (M6) depends on
whether a plugin is on:
- No tool-changer plugin: ncSender sends
M6to the controller. grblHAL then follows its Tool Change Mode setting ($341). - Tool-changer plugin on: ncSender runs the plugin's tool change instead.
The grblHAL Tool Change Mode options are:
$341 |
Tool Change Mode | What happens |
|---|---|---|
| 0 | Normal | You can jog to touch off, then set the new position by hand. |
| 1 | Manual touch off | Moves to the tool-change position. Jog or use $TPW to touch off. |
| 2 | Manual touch off @ G59.3 | Moves to the tool-change position, then to G59.3 to touch off by hand. |
| 3 | Automatic touch off @ G59.3 | Moves to the tool-change position, then to G59.3 to touch off automatically. |
| 4 | Ignore M6 | The controller ignores M6. |
The tool-change position is the tool-axis home, G59.3 or G30, depending on your other grblHAL settings.
FluidNC
This page covers grblHAL. FluidNC tool changes aren't covered here yet.
Tool Length Setter (TLS)
The TLS sets a Tool Length Reference (TLR) so Z stays right after a tool change.
Hold TLS (or send $TLS) to measure:
- ncSender switches to the TLS probe input, if you use a separate one.
- The machine moves to the TLS and touches off the tool.
- The tool length offset is saved for the current tool.
- The probe input is switched back and the machine returns to where it was in X and Y.
Measuring after power-up
After the machine is powered on, the tool in the spindle has to be measured once before it cuts. Until then:
- The TLS button blinks red. The pendant's TLS blinks too.
- A blue note on the 3D view says "T1 hasn't been measured since power-up. Run TLS now, or it's measured automatically when the job starts." It hides while a job or tool change runs. If you already set Z0, the Z0 note shows instead.
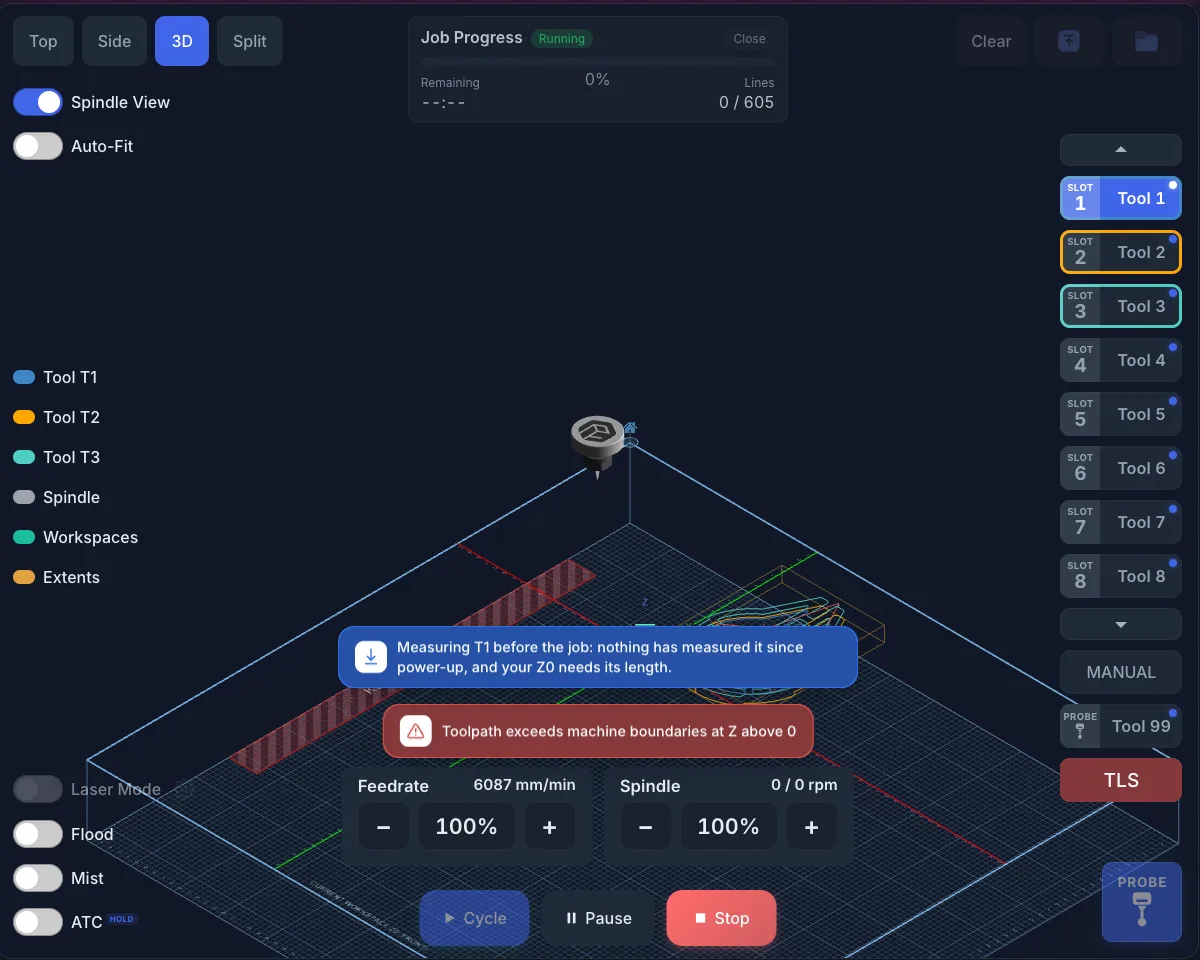
You don't have to do anything. When you press Cycle Start, ncSender first measures the loaded tool on the tool setter, then starts the program. A blue banner says "Measuring T1 before the job…" while it happens. This keeps a Z0 saved in the controller from an earlier session correct.
It is skipped when:
- the program's first tool change loads a different tool (that change measures anyway),
- laser mode is on,
- no tool is loaded,
- no tool changer plugin with a tool setter is on.
To measure right after homing instead, turn on TLS after homing in Settings → Tool Changer. Homing then ends with a trip to the tool setter, and a blue banner says "Measuring T1 after homing…". Once the tool is measured, later homes don't measure it again.
Set Z0 before or after TLS: both work
You can set Z0 first and measure later, or measure first and set Z0 after. The result is the same, and your Z0 is kept either way.
- Z0 first, measure later. If you set Z0 while no Tool Length Reference
exists, ncSender remembers it and which tool set it. The visualizer shows a
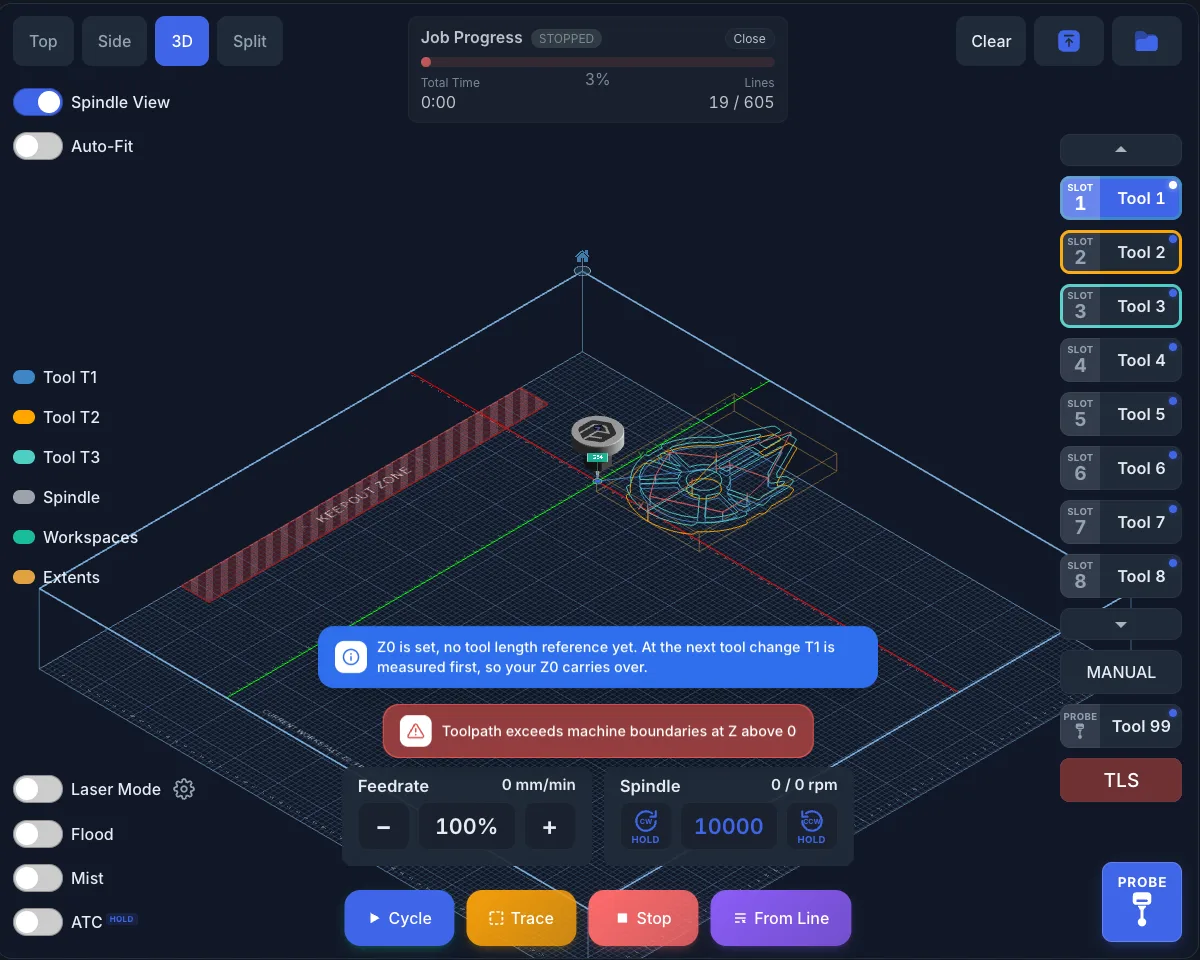
short note while that is pending. The next measurement keeps your Z0:
- TLS (the button or
$TLS) measures the tool and moves the work offset by the same amount. - A tool change first touches off the tool that is still in the spindle, then swaps and measures the new one. Your Z0 carries over to the new tool. A blue banner says so while it happens and goes away when that step is done.
- TLS (the button or
- Measure first, Z0 after. The classic order: hold TLS, then set Z0.
Coming from gSender?
Your habit works here: home, load the bit, probe Z, run the job. At the first tool change the old bit is measured before it comes out, just like gSender's tool change.
The one case ncSender can't carry over: the tool number changed without a
tool change, for example with M61, after you set Z0. The note then turns
orange and says so. Set Z0 again with the tool that is in the spindle.
Keeping Z0 needs a tool changer plugin
Manual Tool Changer, Rapid Change ATC and Pneumatic ATC all keep your Z0.
Without one of them, $TLS and M6 go straight to your controller, so
measure first and set Z0 after.
Laser mode
Tool buttons and the TLS warnings don't apply in laser mode, because a laser has no tool length.