Pendant
The ncSender Wireless Pendant is a handheld controller for your CNC machine. It gives you a live position readout and hands-on control of jogging, zeroing, homing, probing, tool changes, aux outputs and running jobs, right at the machine.
It connects to ncSender wirelessly through a small Wireless USB, so you can walk around the machine while you work.
Minimum versions
- Wireless firmware updates — Wireless USB v0.3.5 or newer. See Wireless USB →.
- Running the pendant alongside other wireless accessories:
- ncSender — v2.0.63 or newer
- ncSender Pro — v2.0.117 or newer
- Pendant firmware — v1.0.16 or newer
- Wireless USB firmware — v0.3.0 or newer
- Tool picker with Manual, live tool changer updates and the TLS reminder — pendant firmware v1.0.37, ncSender v2.0.148 or ncSender Pro v2.0.220 or newer.
Hardware
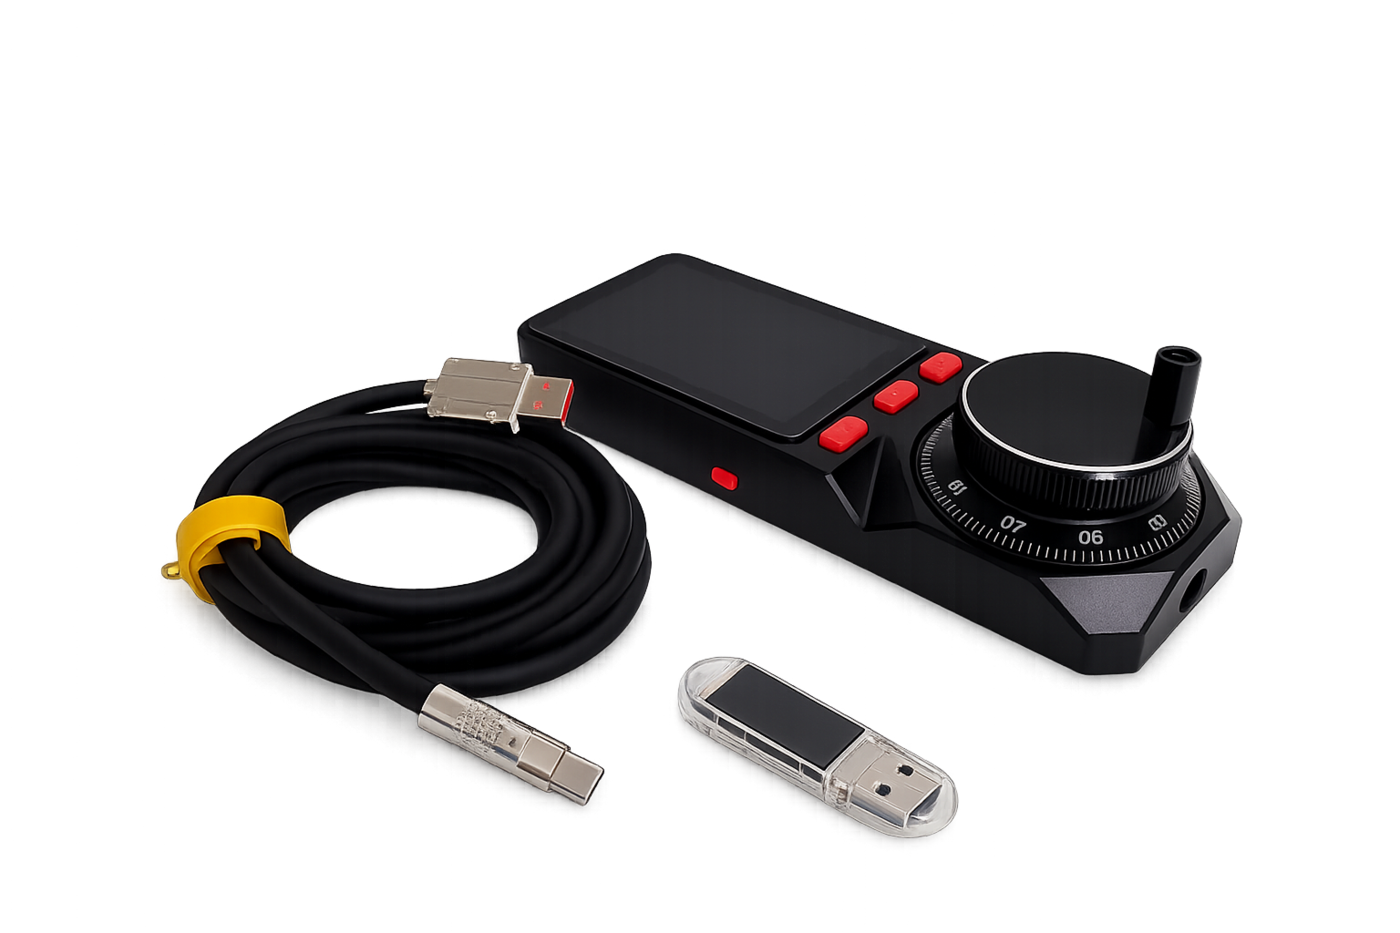
- Pendant — a battery-powered handheld with a touch display, a jog knob, three soft buttons and a power button.
- Wireless USB — a small USB stick that plugs into the computer running ncSender and links to the pendant wirelessly.
Getting connected
- Plug the Wireless USB into the computer running ncSender.
- Power on the pendant (hold the power button).
- Once paired, the pendant reconnects on its own and its status bar shows the connection icon.
Once connected, the pendant follows your machine live, and every button you press acts on the machine right away.
First-time pairing
- In ncSender, open Accessories (the pendant icon in the toolbar).
- Click Pair Device. You have 60 seconds.
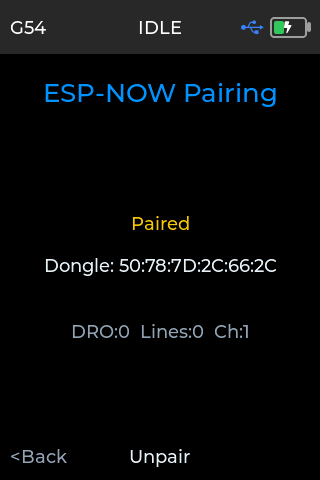
- On the pendant, go to Setup → ESP-NOW and press Scan.
- Select Pendant in Accessories. It shows Connected.
Pair Device needs an activated Wireless USB. See Wireless USB →.
Activating the pendant
A pendant that isn't activated shows Activation Required.
- Connect the pendant to the computer with its USB cable.
- In ncSender, open Accessories and select Pendant.
- Click Activate. If the pendant has been activated before, that is all. If it is new to the store, enter the Installation ID that came with it.
Re-pairing the pendant
Pairing is remembered, so you shouldn't normally need to do it again. Re-pair when:
- You swapped in a different Wireless USB, or moved the pendant to another machine.
- The pendant no longer connects after a Wireless USB update.
- The connection has become unstable and reconnecting doesn't help.
Steps:
- Unpair in ncSender. Open Accessories, select Pendant, click Unpair in the Pairing card, and confirm.
- Unpair on the pendant. Go to Setup → ESP-NOW and choose Unpair if the pendant still shows itself as paired.
- Click Pair Device in Accessories. You have 60 seconds.
- Scan on the pendant. Go to Setup → ESP-NOW → Scan.
- Check it. The connection icon on the pendant lights up, and Pendant shows Connected in Accessories.
If the pendant doesn't find the Wireless USB
- Press Scan as soon as you click Pair Device. If the countdown runs out, click Pair Device again.
- Make sure the pendant is on v1.0.16 or newer when the Wireless USB is on v0.3.x.
- If it still won't pair, update the Wireless USB (see Wireless USB →) and try again.
Screens
Hold Prev or Next for half a second to move between screens: Jog, Aux & Tool Change, Probe, Job and Info. Open Setup from the Info screen.
Hold to activate
Anything that moves the machine, changes a tool or ends a job needs a 1-second hold on the touch screen, so a stray touch can't set it off. While you hold, a white fill sweeps across the control. Lift your finger before the fill completes, or slide it off, to cancel.
A tap on the screen only selects the control. Once it's selected, press Exec (the middle soft button) to run it straight away.
Jog
The home screen: your live readout and jogging controls.
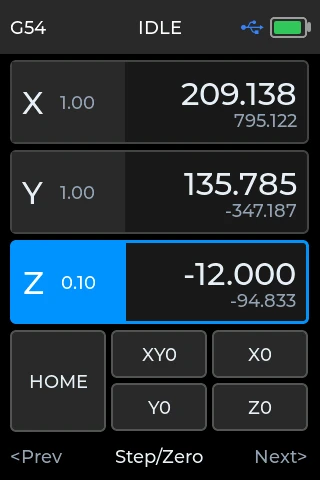
Status bar (top) shows the active workspace (e.g. G54), the machine
status (IDLE, RUN, HOLD, ALARM, …), the connection icon and the
battery level.
Position readout lists each axis (X, Y, Z) with its work position in large type and the machine position in smaller type underneath. The highlighted axis is the one the jog knob moves. The small number next to each axis label is the current jog step.
Turn the jog knob to move the selected axis. Turning faster moves faster. Z jog is limited to what your machine can stop cleanly, so fast turns don't overshoot.
Changing the step size. Use Prev / Next to pick an axis, then press
Step/Zero to cycle its step: 0.01, 0.1, 1.0. X and Y share a step;
Z has its own.
Zeroing an axis. Hold the axis card on the screen for 1 second, or hold Step/Zero with the axis selected. The fill sweeps across the position side of the card.
Buttons:
- HOME — run the homing cycle.
- XY0 / X0 / Y0 / Z0 — move to zero on those axes. The machine lifts to safe Z first.
Hold a button on the screen for 1 second to run it.
Footer. Three soft buttons below the screen: Prev, the middle button and Next.
- Prev / Next — move between the axes and buttons.
- Step/Zero (axis selected) — press to cycle the step, hold to zero the axis.
- Exec (button selected) — run the button.
- Hold Prev / Next — change screen.
Aux & Tool Change
Aux switches, the tool changer slot picker and tool-change actions in one place.
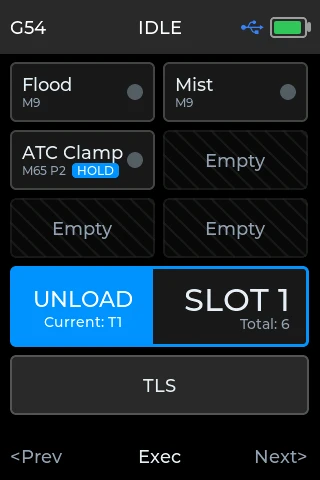
Aux switches (top). Up to six switches, each with its name and an ON/OFF dot. Empty spaces show Empty.
If you haven't set up any aux outputs, the first two are Flood and Mist. Add or change them in ncSender under Settings → Advanced → Auxiliary I/O. Changes reach the pendant right away.
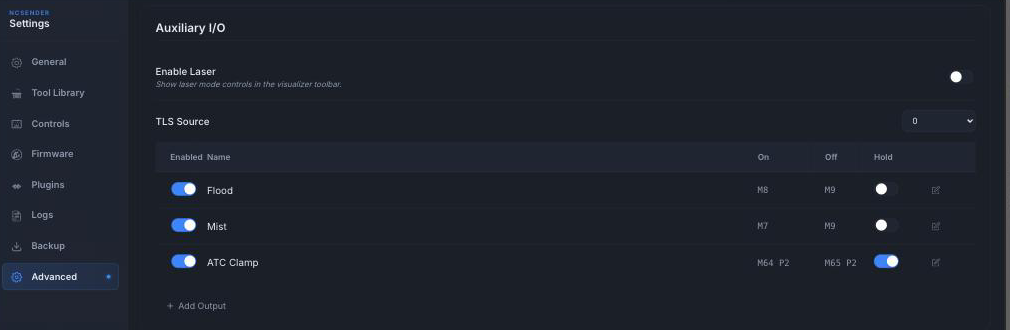
Hold a switch on the screen for 1 second to turn it on or off. Switches set to hold-to-activate show a HOLD badge after their command, and need a hold on Exec too.
Tool picker (middle). The right side shows the chosen tool (e.g. SLOT 1) with your total slots underneath (Total: 6). The left side shows LOAD or UNLOAD with the tool in the spindle underneath (e.g. Current: T1).
Turn the jog knob to pick a tool. After the last slot the picker offers:
- Manual — change to a tool by hand, when your tool changer allows it.
- Probe — load the probe, when the probe tool is turned on in your tool changer.
Hold the picker on the screen for 1 second, or press Exec, to load the chosen tool. If the chosen tool is already in the spindle, the same action unloads it.
The slots, Manual, Probe and TLS come from your tool-change plugin (Pneumatic ATC, Rapid Change ATC or Manual Tool Changer). The pendant updates as soon as you enable, disable or change the plugin. With no tool changer set up, the picker is hatched out and can't be selected.
TLS (bottom). Measure the tool length. Hold for 1 second, or press Exec. When a tool is loaded but hasn't been measured since power-up, TLS blinks red, the same as in ncSender, to remind you to measure it. See Measuring after power-up. TLS is hatched out when your tool changer has no tool length setter.
Footer. Prev / Next move between items. Exec runs the chosen item. Hold Prev or Next to change screen.
Probe
Jog to the touch-off point and start a probe without walking back to ncSender.
- Pick the axis and step at the top, and turn the jog knob to move the machine into place.
- Choose the probe type: 3D Probe, Std Block, AutoZero or TLS.
- Choose the mode: Z, XYZ, XY, X, Y, Center-In or Center-Out.
- Pick where the probe sits on the work: a corner, an edge or the centre. For Center-In and Center-Out, turn the jog knob to set the diameter instead.
- Hold Start Probe for 1 second.
While probing, the button changes to Stop Probe. Hold it for 1 second to stop.
If Start Probe is unavailable, the line under it tells you why. For example, the machine is busy, the pendant isn't connected, or you need to touch the probe once to test it. The PROBE and TLS dots light up when the probe is triggered.
Plunge, offsets, feeds and the 3D probe's ball diameter come from your probe settings in ncSender.
Footer. Prev / Next move between rows. Select changes the chosen row. Long-press Select to start the probe.
Job
When you start a program, the pendant switches to the Job screen. You can also reach it any time from the screen cycle.
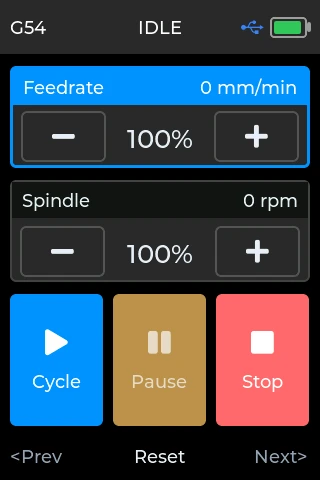
Feedrate and Spindle. Each card's title bar shows the live feed rate (mm/min or in/min) and spindle speed. Use the card to change its override while the program runs:
- Tap − or + to change the override by 10 %. Hold the button to keep changing it.
- Tap the percentage to reset it to 100 %. It turns blue when it isn't at 100 %.
- Or pick the card with Prev / Next and turn the jog knob. Reset sets it back to 100 %.
Overrides go from 10 % to 200 %. Lowering the feed override also slows rapid moves (see Overrides).
Program buttons. They use the same colours as in ncSender:
- Cycle (blue) — start or resume the program. Hold for 1 second.
- Pause (amber) — pause the program. A single tap pauses straight away.
- Stop (red) — stop the program. Hold for 1 second.
Why does Pause work on a tap, but Stop needs a hold?
A paused program simply carries on when you resume it, so an accidental tap on Pause costs nothing, and you can pause the moment you need to. A stopped program can't be resumed; it has to be started again. The 1-second hold on Stop makes sure it only happens when you mean it.
Stop on the pendant isn't an emergency stop. Use your machine's E-stop for emergencies. If you want to stop right away from the pendant, select Stop and press Exec.
A button that can't be used right now is shown faded and can't be selected: Cycle while the program is running, and Pause when nothing is running or the program is already paused.
With a button selected, press Exec to run it straight away. With a card selected, the middle button is Reset.
When the job finishes or you stop it, the pendant stays on the Job screen.
Info
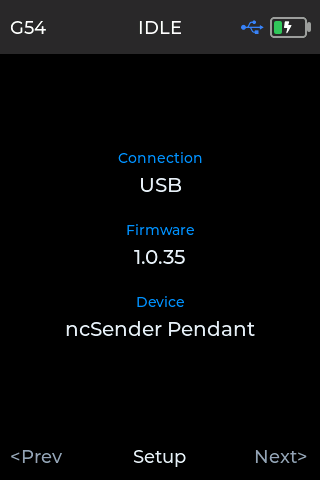
Shows the pendant's connection type, firmware version and device name. Press Setup here to open the Setup screen.
Setup
The pendant's own preferences.
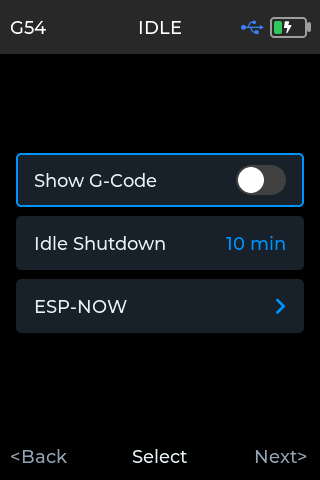
- Show G-Code — when on, commands from the pendant show in ncSender's console.
- Idle Shutdown — how long the pendant waits with no activity before it turns itself off. Choose from 5 to 30 minutes. Turn the jog knob or tap the row to change it.
- ESP-NOW — pair or unpair with a Wireless USB.
Idle shutdown only runs on battery
While the pendant is plugged into USB, it stays on. Any touch, button or knob movement restarts the timer.
Alarm prompt
When the machine goes into alarm, the pendant shows ALARM with the alarm number and its description. Press Unlock to clear it. The prompt closes by itself when the alarm is cleared anywhere, including from ncSender.
Managing the pendant from ncSender
Open Accessories (the pendant icon in the toolbar) and select Pendant.
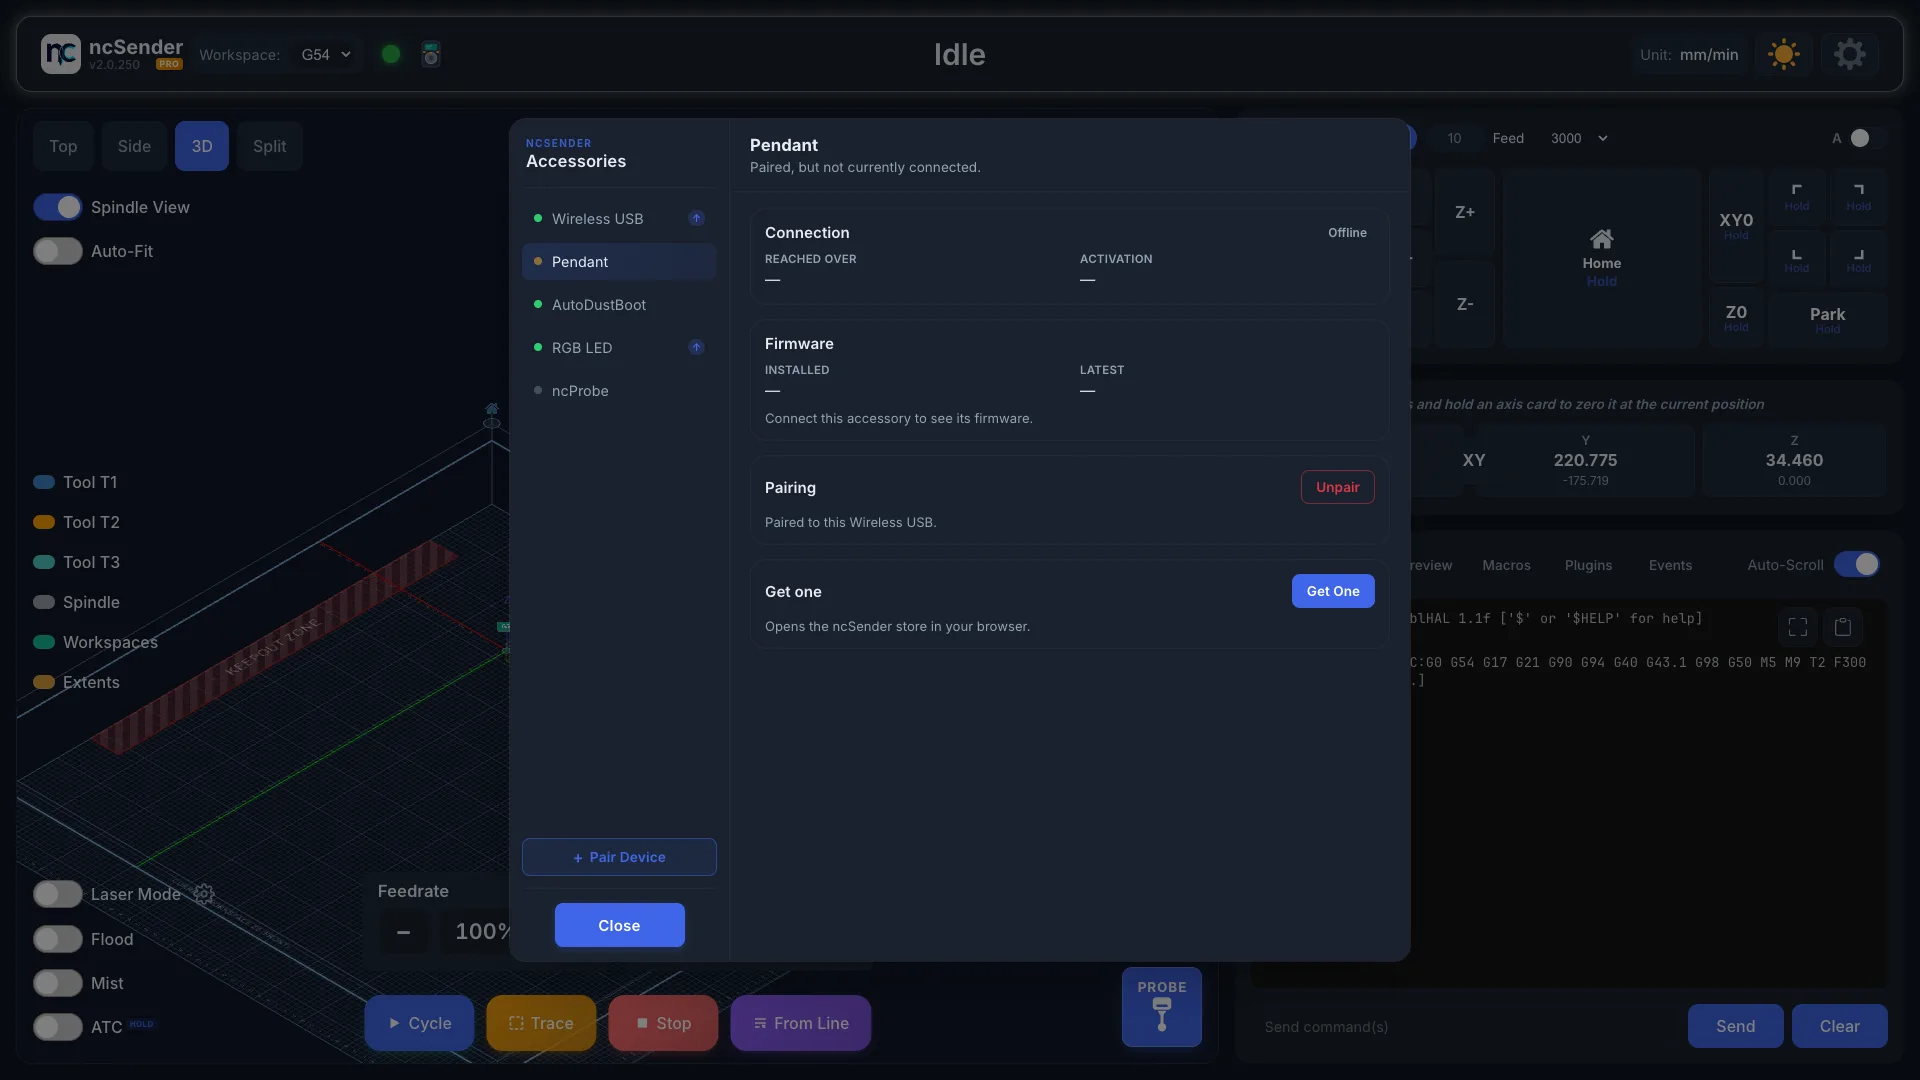
Here you can:
- See whether the pendant is connected, and whether over USB or Wireless.
- Copy its Device ID for support.
- Activate it.
- Update its firmware.
- Unpair it.
Updating pendant firmware
- Open Accessories and select Pendant.
- Click Update to v… in the Firmware card.
-
Keep the pendant powered and connected until it finishes.
-
With the USB cable plugged in, the update goes over the cable. Otherwise it goes wirelessly through the Wireless USB.
- ncSender picks the right firmware for your pendant, and handles older pendants on the cable automatically.
- If an update is interrupted, the current firmware keeps working. Just start again.
Wireless USB
Pendant traffic runs through the Wireless USB →, the same stick the AutoDustBoot and RGB LED use. Updating the Wireless USB doesn't require updating the pendant.