AutoDustBoot
The AutoDustBoot is a motor-driven dust boot with its own controller. It retracts and expands the boot for you, and can be driven in two ways, so it works with many CNC setups.
V1 vs V2
AutoDustBoot V1 is TTL-only. The controller watches a single input wire from your CNC controller to retract or expand. Anything with a 3.3 V or 5 V logic output can drive it, including Masso, Buildbotics and grblHAL.
AutoDustBoot V2 Soon keeps the TTL input, so it drops straight into a V1 setup. It also adds a wireless link to ncSender through the Wireless USB →. Wirelessly, it reports its state, position, saved position and whether it is homed, and accepts retract, expand, home and save commands.
You can run a V2 as:
| Setup | What it uses | Works on |
|---|---|---|
| TTL (V1-compatible) | The TTL aux input | Any CNC controller with a spare 3.3–5 V logic output (Masso, Buildbotics, grblHAL, …) |
| Wireless + ncSender plugin | The Wireless USB → | ncSender only |
If you run ncSender on grblHAL, use wireless. On another controller, wire it to a TTL aux output and drive it from your G-code.
TTL setup
What you need
- A 3.3 V or 5 V aux output on your CNC controller. The Flood (
M8) or Mist (M7) pins are common choices. AnyM64 P<n>/M65 P<n>aux pin works too. - A wire from that pin to the AutoDustBoot's control input, plus ground.
Operating it
Once wired, retract and expand with G-code:
| Action | With M7 / M8 | With M64 aux pin |
|---|---|---|
| Retract (pin high) | M8 |
M64 P0 |
| Expand (pin low) | M9 |
M65 P0 |
From ncSender, no plugin
Without the plugin, you drive the boot yourself:
- From the console — type
M8to retract andM9to expand. - From your G-code — add a retract before each
M6and$H, and an expand after the first move at the next cut. Most CAM programs let you add these in the post-processor.
You're responsible for every retract
Without the plugin, ncSender doesn't know the AutoDustBoot exists. If your
program has an M6 with no retract before it, the boot will hit the
spindle carriage.
From other controllers (Masso, Buildbotics, …)
Wire it the same way, and toggle the pin with whatever your controller uses
(usually M8 / M9, or its macros).
Wireless setup (V2 only)
- Plug the Wireless USB into the computer running ncSender.
- Power on the AutoDustBoot V2.
- In ncSender, open Accessories (the pendant icon in the toolbar) and click Pair Device. You have 60 seconds.
- On the AutoDustBoot, start pairing mode: hold Retract ▲ and Extend ▼ (the first and third buttons) together until it starts pairing.
- Select AutoDustBoot in Accessories. It shows Connected.
- If it shows !, click Activate. See Wireless USB →.
- Install the plugin (see The plugin), open Connections, and choose Wireless.
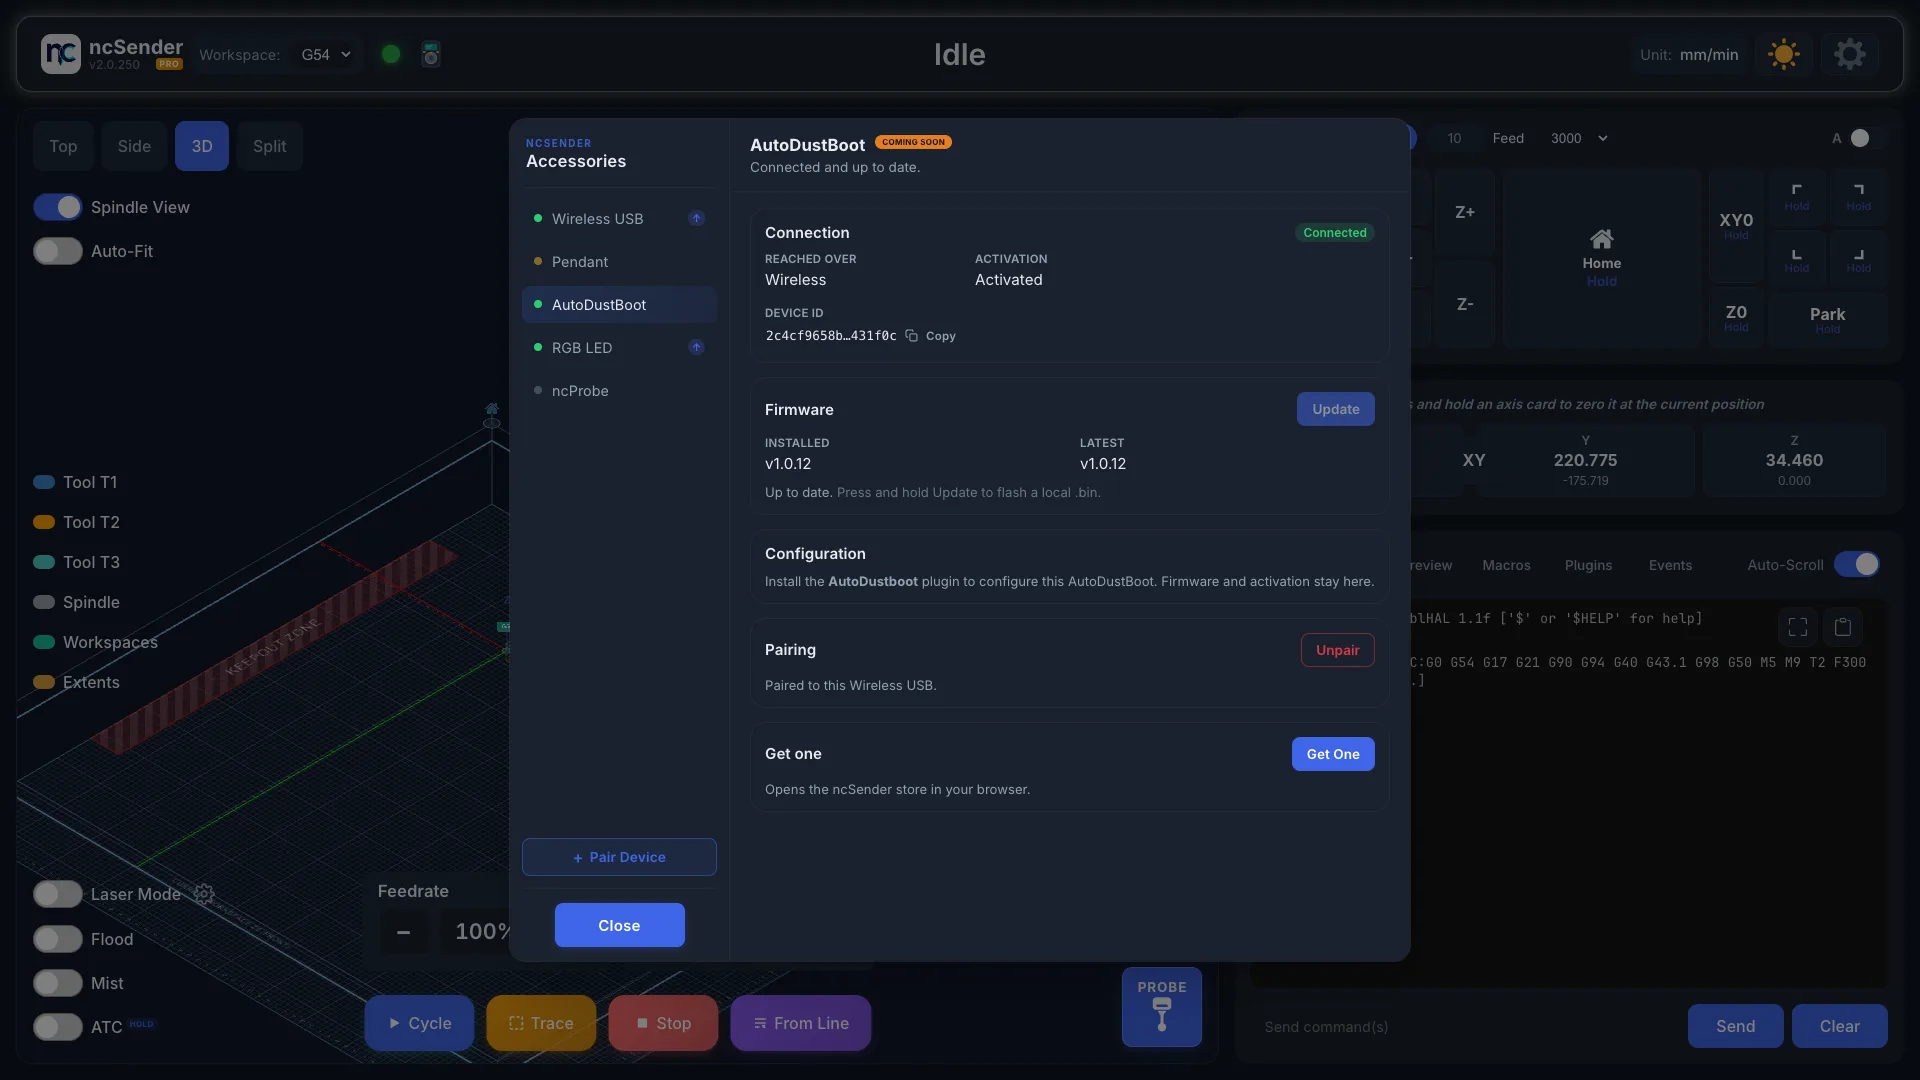
Wireless use needs the plugin. The wireless controller isn't on an aux
pin, so typing M8 does nothing.
Physical buttons
The V2 controller has three buttons on top: Retract (▲), Mode (●) in the middle, and Extend (▼).
| Gesture | What it does |
|---|---|
| Retract ▲ tap | Move the boot up one small step. |
| Retract ▲ hold | Retract until you let go. |
| Extend ▼ tap | Move the boot down one small step. |
| Extend ▼ hold | Extend until you let go. |
| Mode ● double-press | Save the current position as the expand position. |
| Mode ● long-press | Restart the controller. It homes on startup. |
| Hold Retract ▲ while powering on | Skip homing on startup. Use this when homing would crash the boot into the work. |
| Hold Retract ▲ + Extend ▼ together | Start pairing with the Wireless USB. |
The plugin's Connections tab has the same actions: Retract, Expand, Home and Save.
The plugin
Install it from Settings → Plugins → Install Plugin, and choose AutoDustboot. Then open AutoDustBoot from the Tools menu.
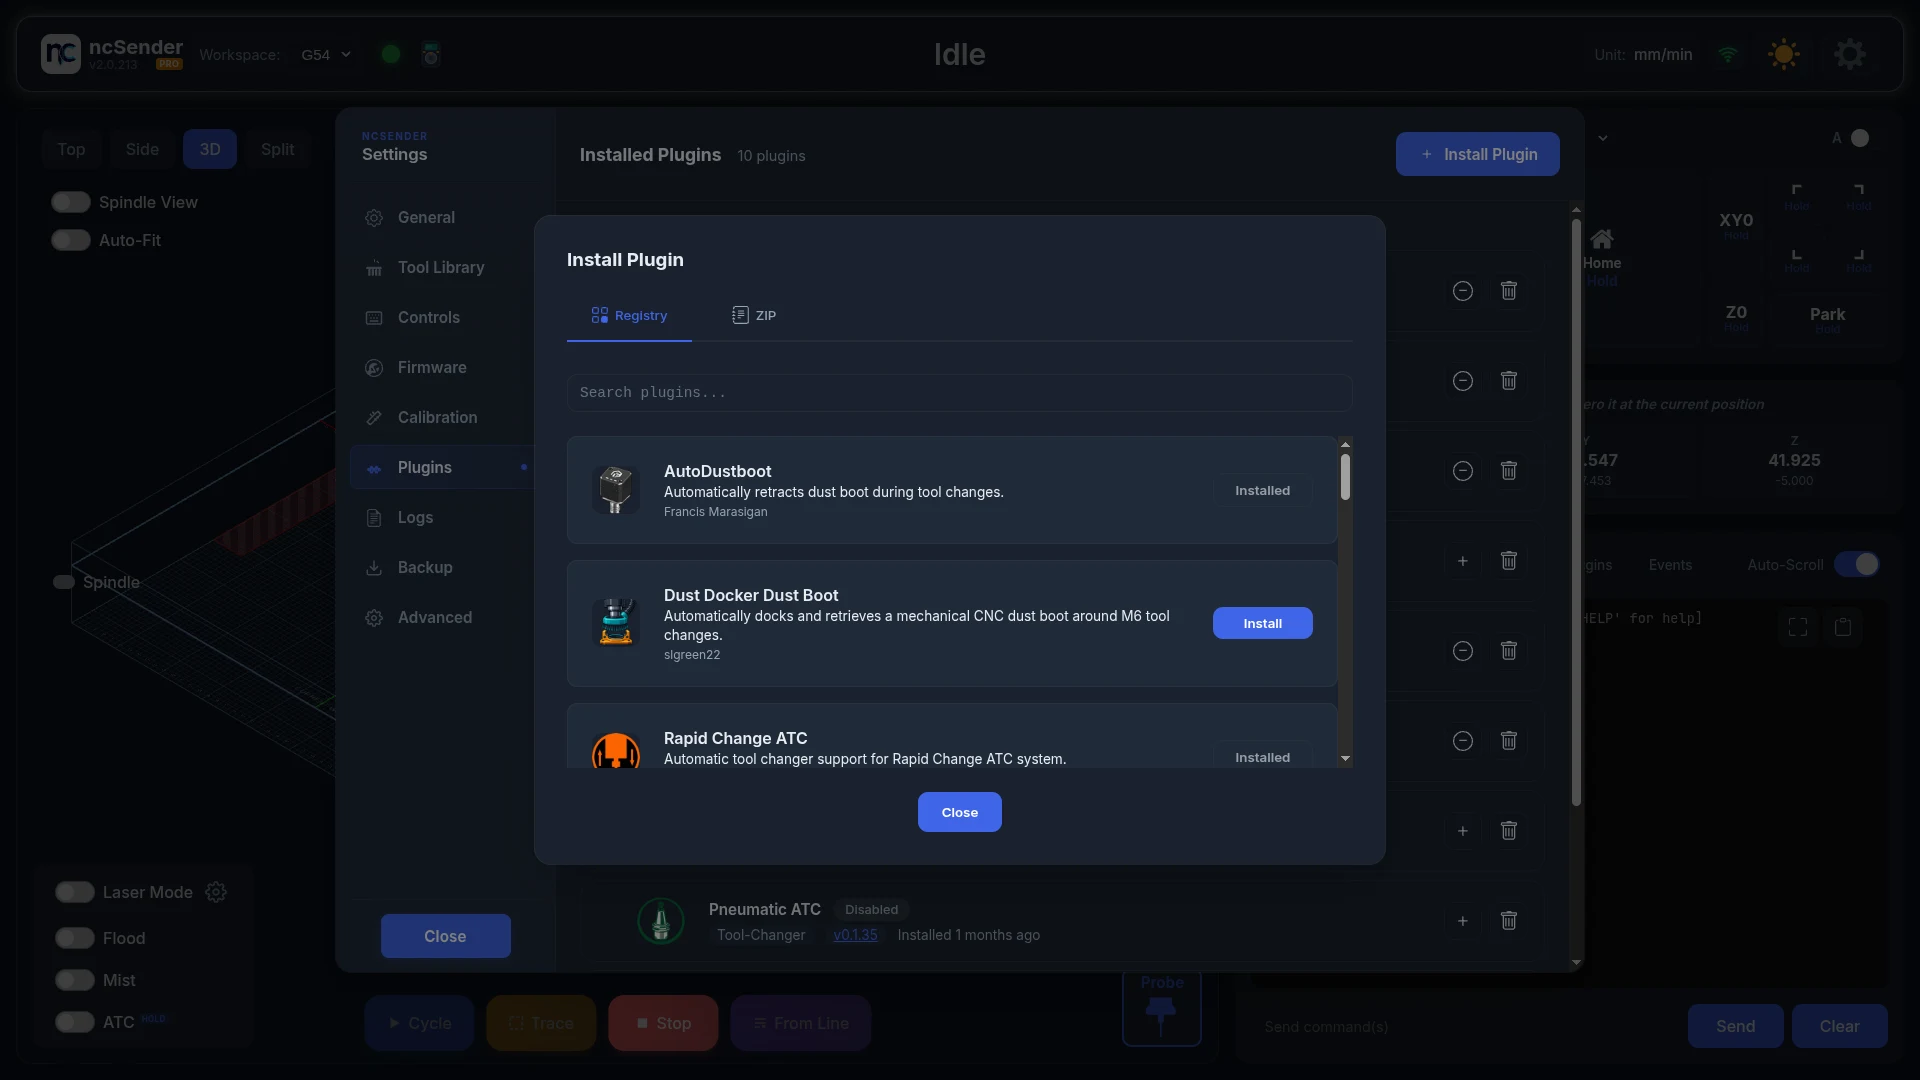
The plugin changes how the boot behaves. Firmware updates and activation are in Accessories.
Connections
Choose Wired or Wireless.
Wired. For a boot driven by an aux pin on your CNC controller. Edit the
G-code the plugin sends to raise and lower the boot. You can add G4 pauses to
let the boot finish moving before the machine continues.
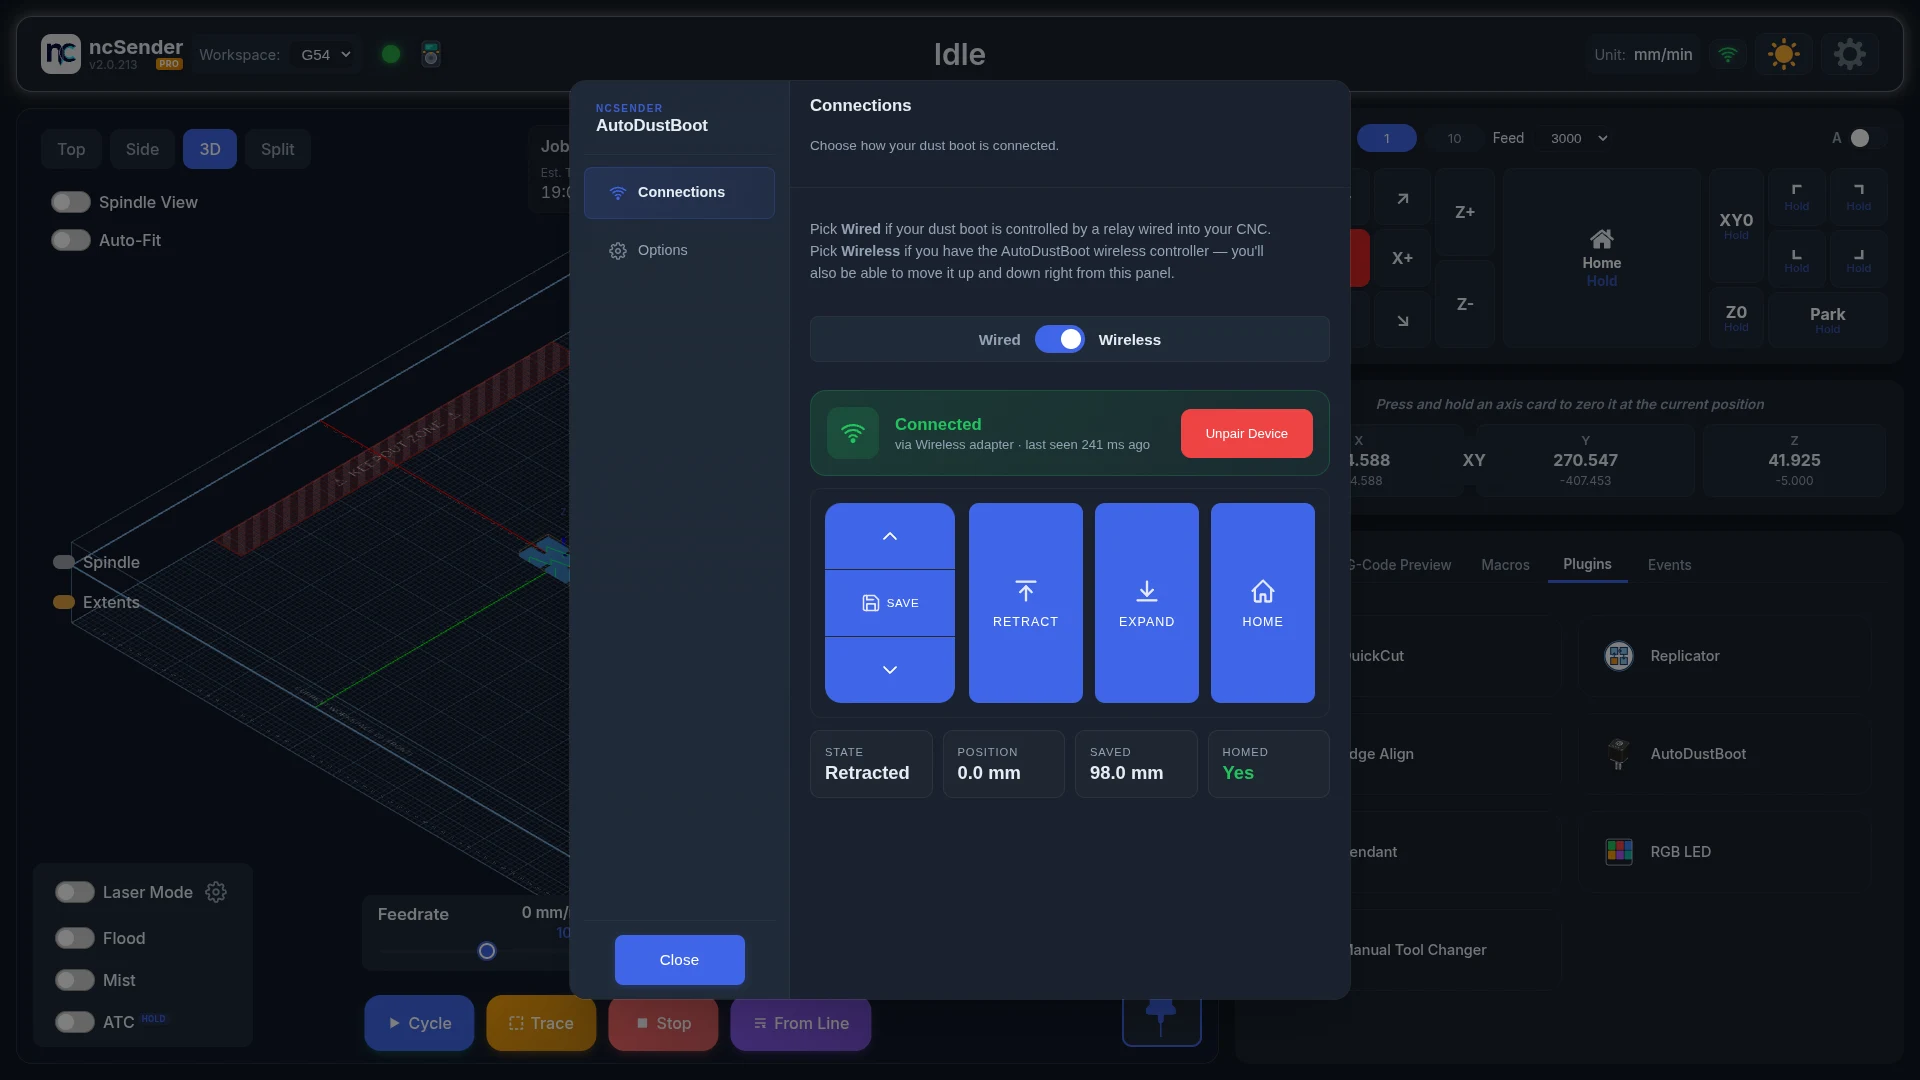
- Retract Sequence — sent before homing, tool changes and (if turned on)
console rapids. The default is
M8·G4 P0.1·M9·G4 P1.5. - Expand Sequence — sent when the boot should come back down, right
before the next cut. The default is
M8.
Wireless. For the V2 wireless controller only.
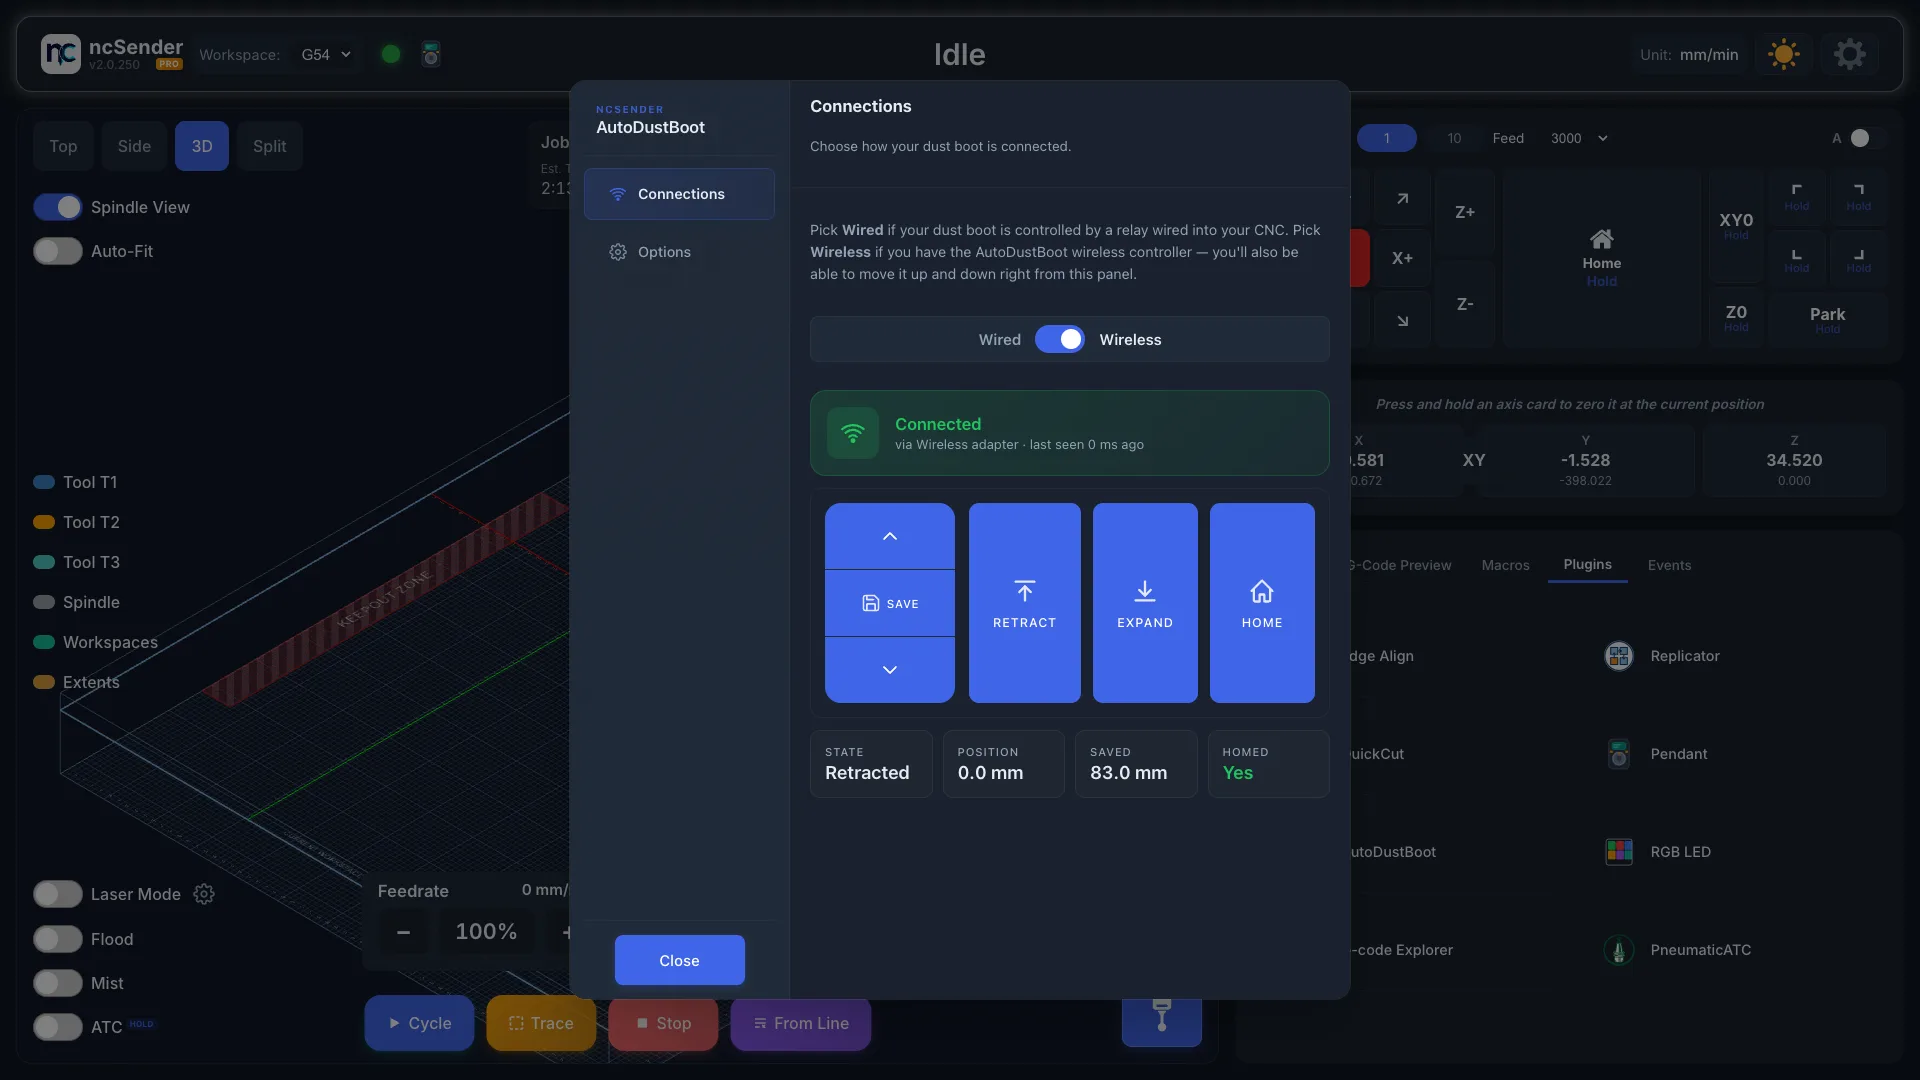
- Retract, Expand and Home move the boot. Hold the up or down arrow to jog it, and click Save to store the current position as the expand position.
- State, Position, Saved and Homed show the boot's live status.
Pairing and unpairing are done in Accessories, not in the plugin. See Wireless setup.
Options
Choose when the plugin retracts the boot.
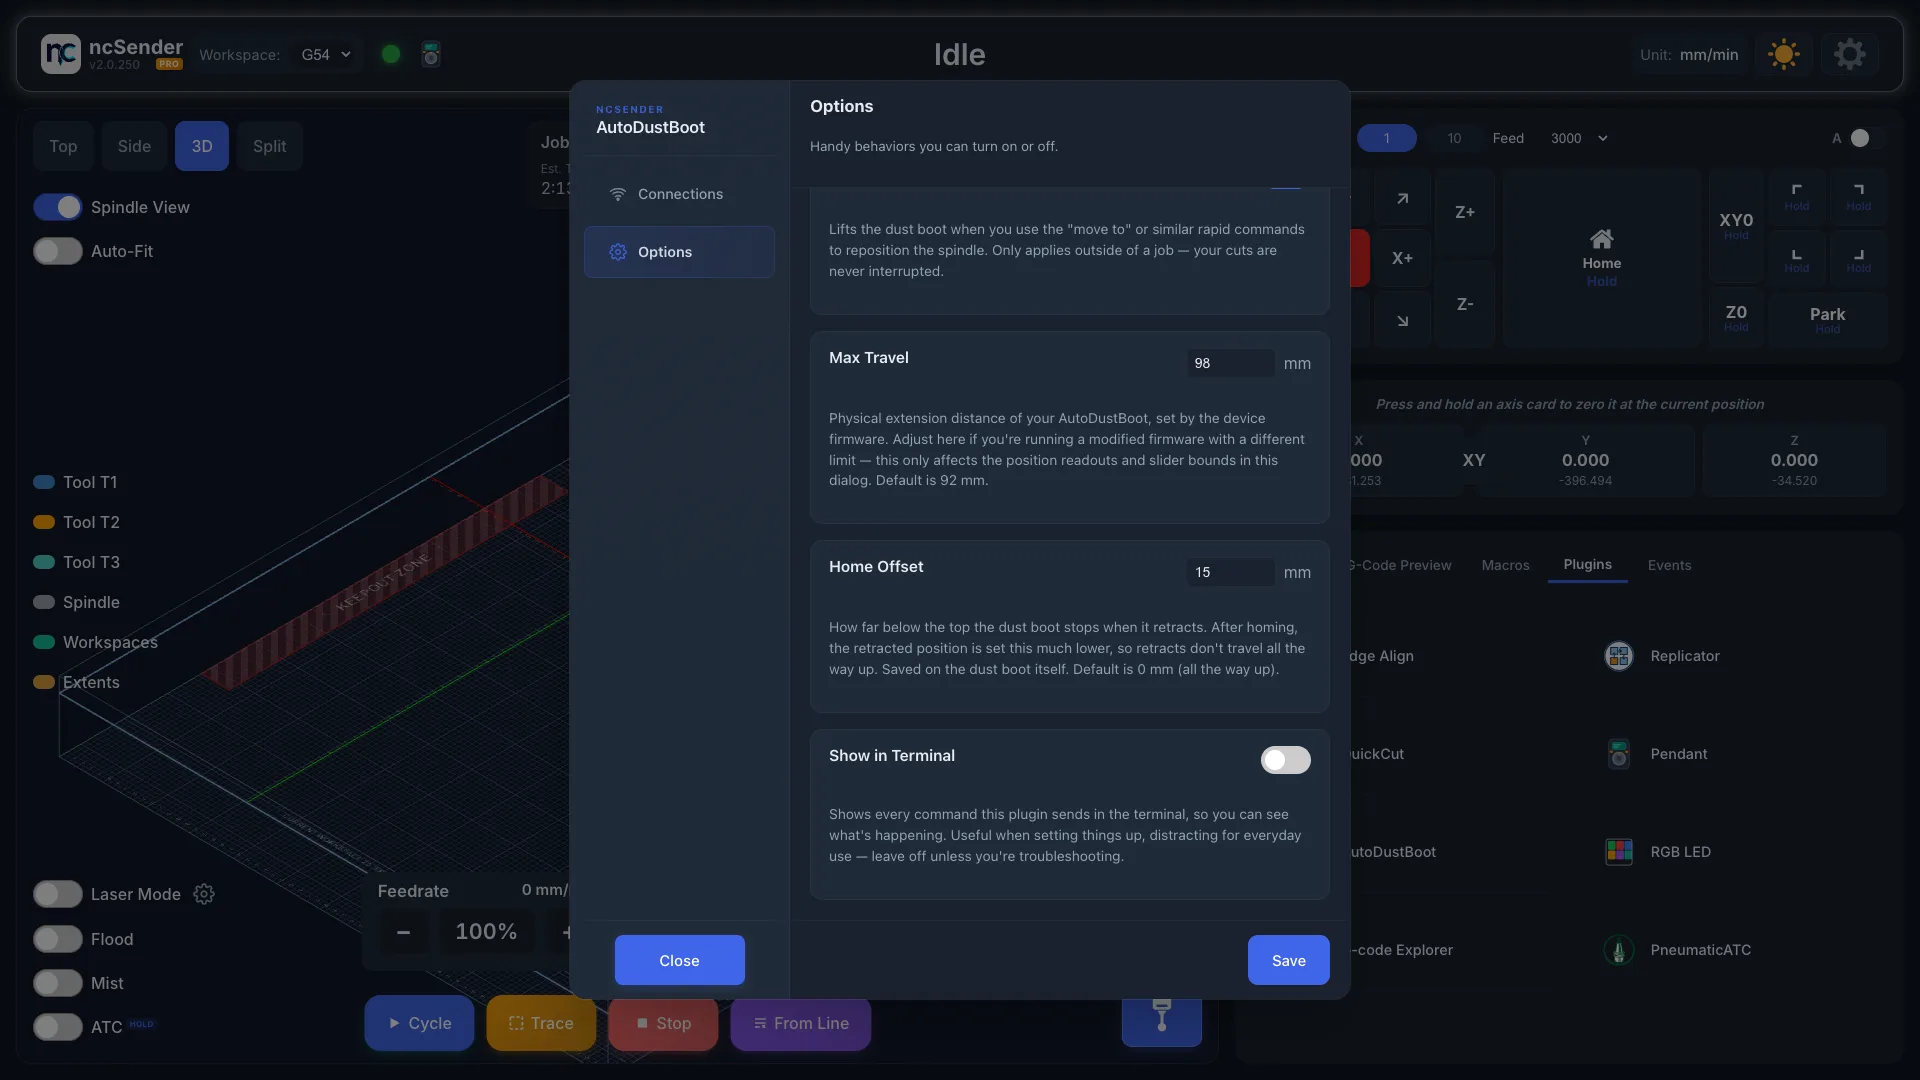
- Retract on Home (on by default) — retracts before homing, so the boot doesn't drag across the work.
- Retract on Rapid Moves (on by default) — retracts before a
G0sent from the console or a macro.G0moves inside a running program are left alone. - Max Travel (92 mm by default) — how far the boot can extend, in mm. It sets the range of the position readouts and the jog slider, and on a V2 it is sent to the controller as the bottom soft limit and saved there. Only change it if your boot has a different stroke than the shipped firmware. Accepts 10–500 mm.
- Home Offset (0 mm by default) — how far below the top the boot stops when it retracts. With 0 it goes all the way up. Set, say, 10 mm and every retract stops 10 mm lower, which is quicker and keeps it off the top stop. The setting is saved on the boot itself (V2 with firmware 1.0.12 or newer) and takes effect right away, no re-homing needed. Accepts 0–50 mm.
- Show in Terminal (off by default) — shows the plugin's commands in the console. Turn it on when troubleshooting.
Click Save after changing anything.
Commands you can type
With the plugin installed, you can move the boot yourself by typing these in the console. They also work in a macro or in your G-code, on a line of their own.
| Command | What it does |
|---|---|
$ADB_RETRACT |
Retracts the boot (moves it up). |
$ADB_EXPAND |
Expands the boot to the height you saved. |
$ADB_GOTO 20 |
Moves the boot to an exact height: here, 20 mm below its retracted position. |
$ADB_GOTO takes a height in millimetres, measured down from where the boot
sits when retracted. Decimals are fine ($ADB_GOTO 12.5). $ADB_GOTO 0 is the
same as a retract. A height past the bottom of the boot's travel stops at the
bottom.
Like a retract or expand, the machine waits until the boot reports it got
there before it carries on, so you can put $ADB_GOTO in a program right
before a move that needs the boot at that height.
Note
$ADB_GOTO needs the wireless AutoDustBoot (V2, plugin in Wireless
mode, linked over the air or by USB cable). In Wired mode the boot can only
retract and expand, so the console shows a note instead and nothing moves.
The boot also needs to have homed first.
Firmware updates
Firmware updates apply to the V2 only.
- Open Accessories and select AutoDustBoot.
- Click Update to v… in the Firmware card.
- Keep the AutoDustBoot powered and connected until it finishes.
With a USB cable plugged in, the update goes over the cable, which is much faster. Otherwise it goes wirelessly. If an update is interrupted, the current firmware keeps working. Just start again.
What the plugin does for you
Tool change (M6 / $TLS). Retracts the boot before the tool change, and
expands it again right before the first move of the next cut. If your G-code
already expands the boot at that point, the plugin skips its own so the boot
doesn't move twice.
Homing ($H). With Retract on Home on, retracts before homing.
Console rapids (G0). With Retract on Rapid Moves on, retracts before a
G0 sent from the console or a macro.
Waiting for the boot (Wireless). In Wireless mode, whether the boot is
linked over the air or by a USB cable, the machine waits after each retract or
expand until the boot reports that it got there. If it is already in
place, for example a retract when it is already up, there is no wait at all. A
slow move is waited out, so the machine never moves on too early. In Wired
mode, the G4 pauses in your sequences set the wait, as before.
If the boot doesn't answer
If the boot is offline (its radio is reconnecting) or doesn't report that it reached its position, a violet card says "Waiting for the dust boot to answer. Its last move is sent again as soon as it reconnects." ncSender sends the move again for you.
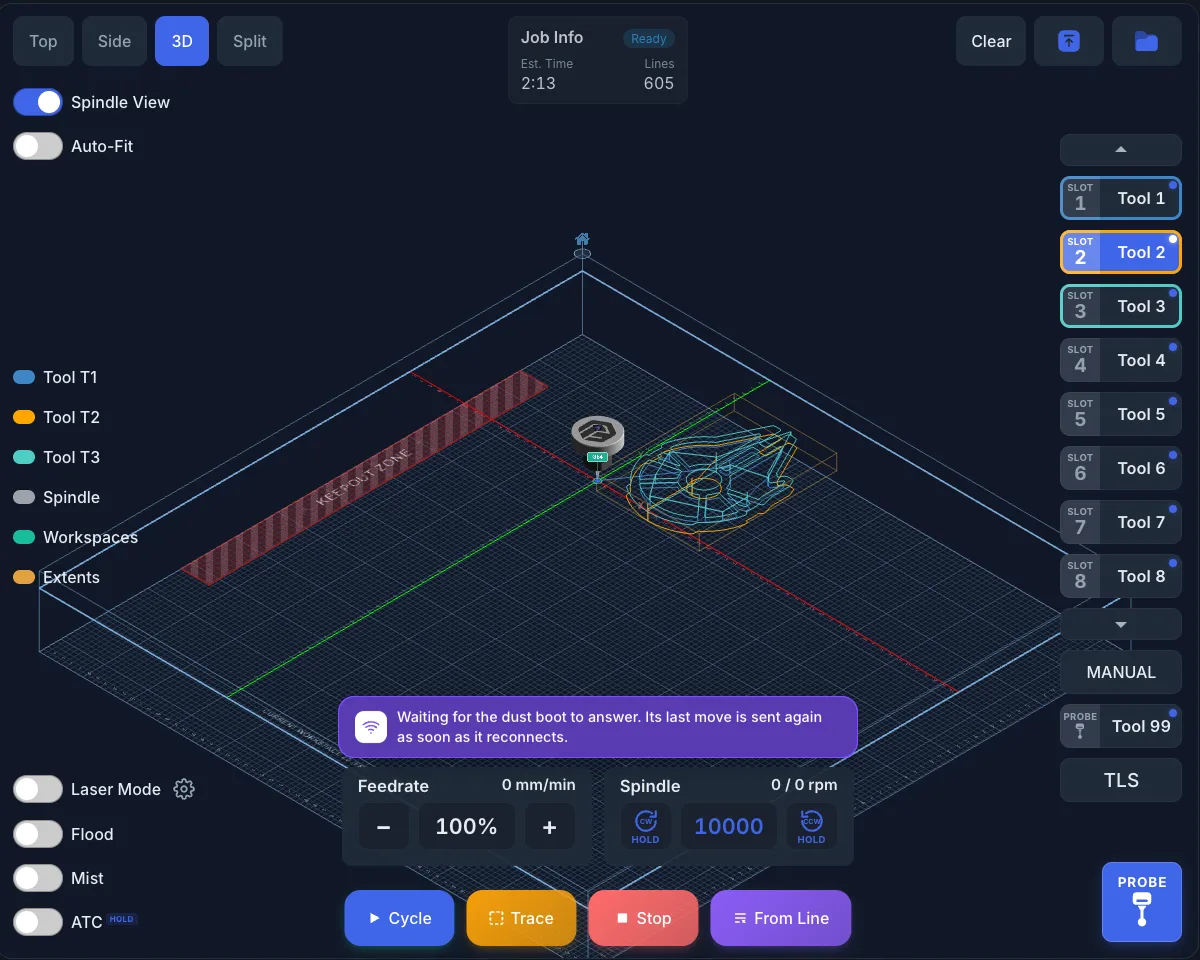
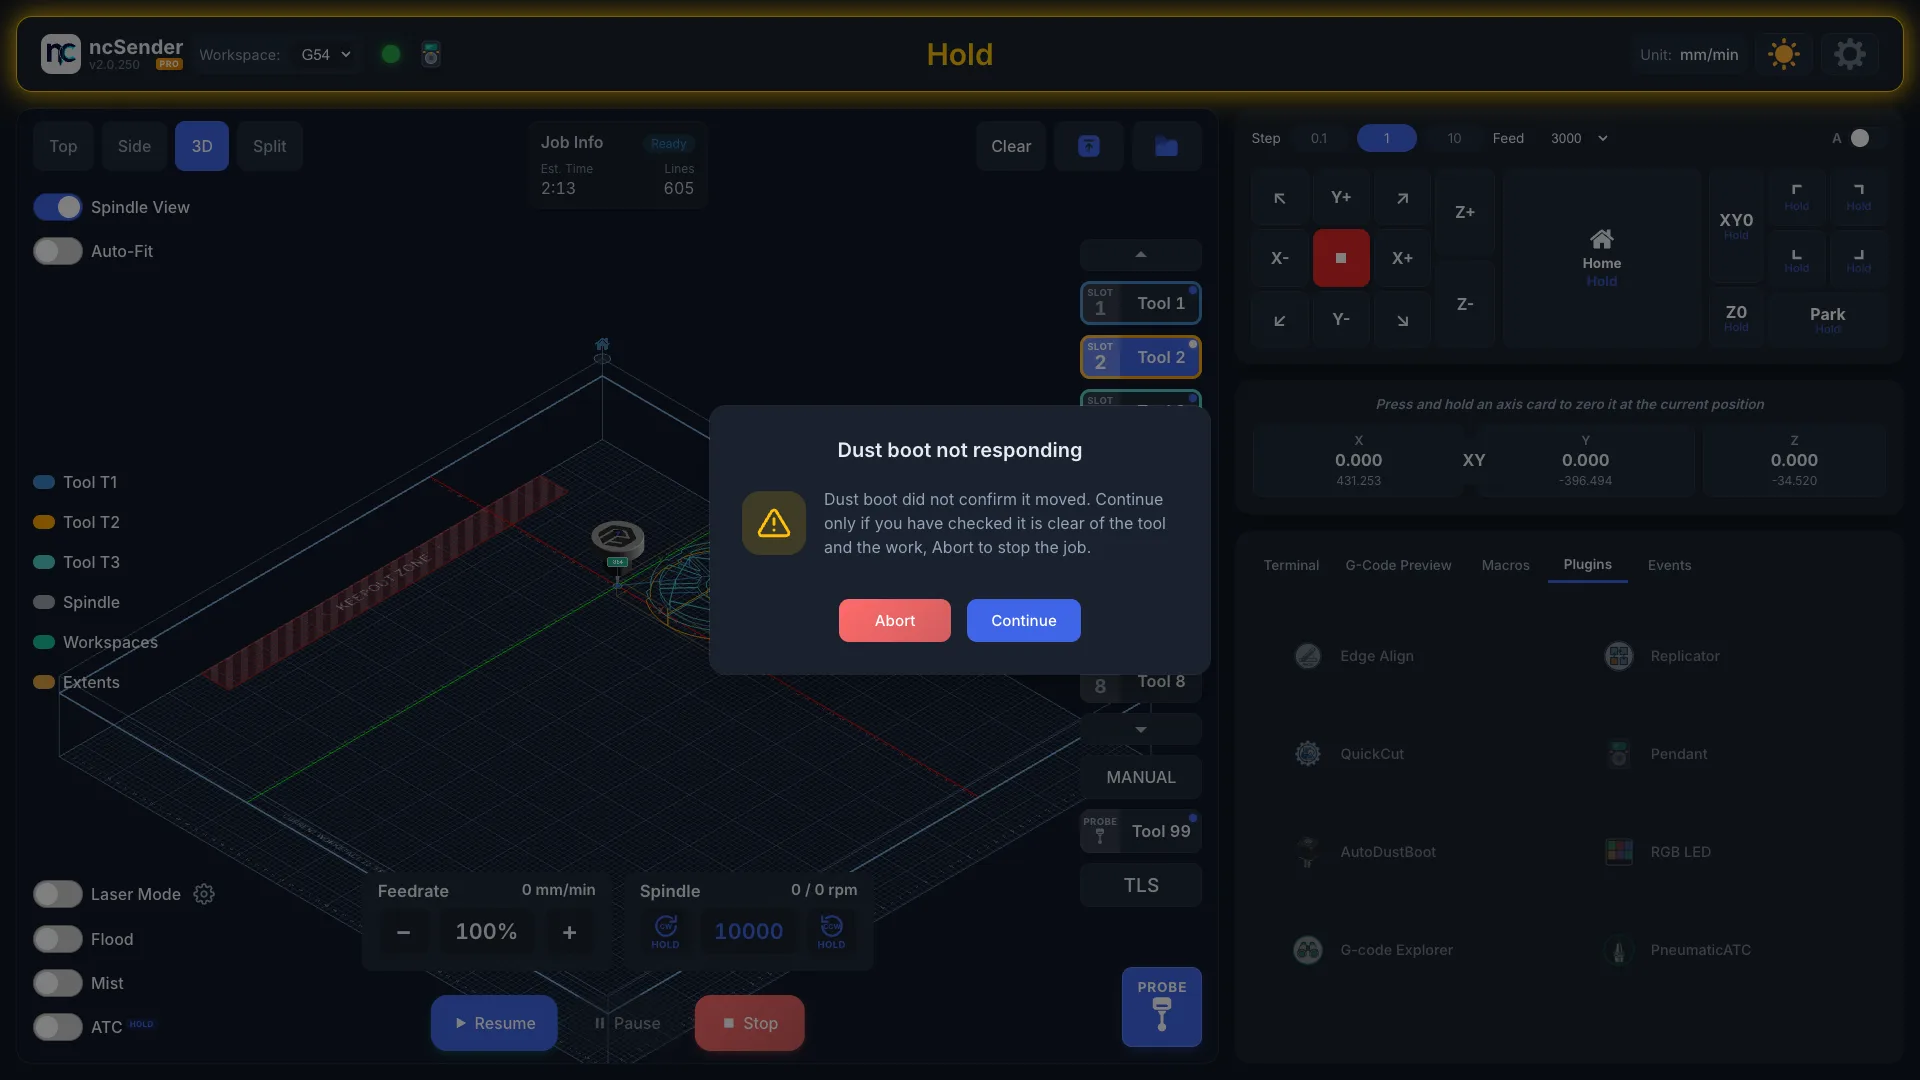
If it still doesn't answer (about 10 seconds at most), the job pauses and Dust boot not responding opens:
- Continue: only after you have checked the boot is clear of the tool and the work.
- Abort: stop the job.
Troubleshooting
- Wired: boot doesn't respond. Check the wiring and polarity. Type the
matching command in the console (e.g.
M8for Flood, orM64 P0for an aux pin) and watch the boot move. - Wireless: the job paused with "Dust boot not responding". The boot didn't confirm its move. Look at the boot and make sure it is clear of the tool and the work before you press Continue. If it happens often, check that it shows Connected in Accessories.
- Wireless: boot doesn't retract on tool change. Open Accessories and select AutoDustBoot. If it isn't Connected, power-cycle the controller. If it still doesn't connect, pair it again.
- Unexpected retract during a job. A macro that sends a
G0during a job triggers Retract on Rapid Moves. Turn the option off if that's a problem. - Boot doesn't clear the work. Move the boot to the height you want and save it again, with Save in the plugin or a double-press of Mode ● on the controller.